
I make gingerbread. It’s a thing … I … do.
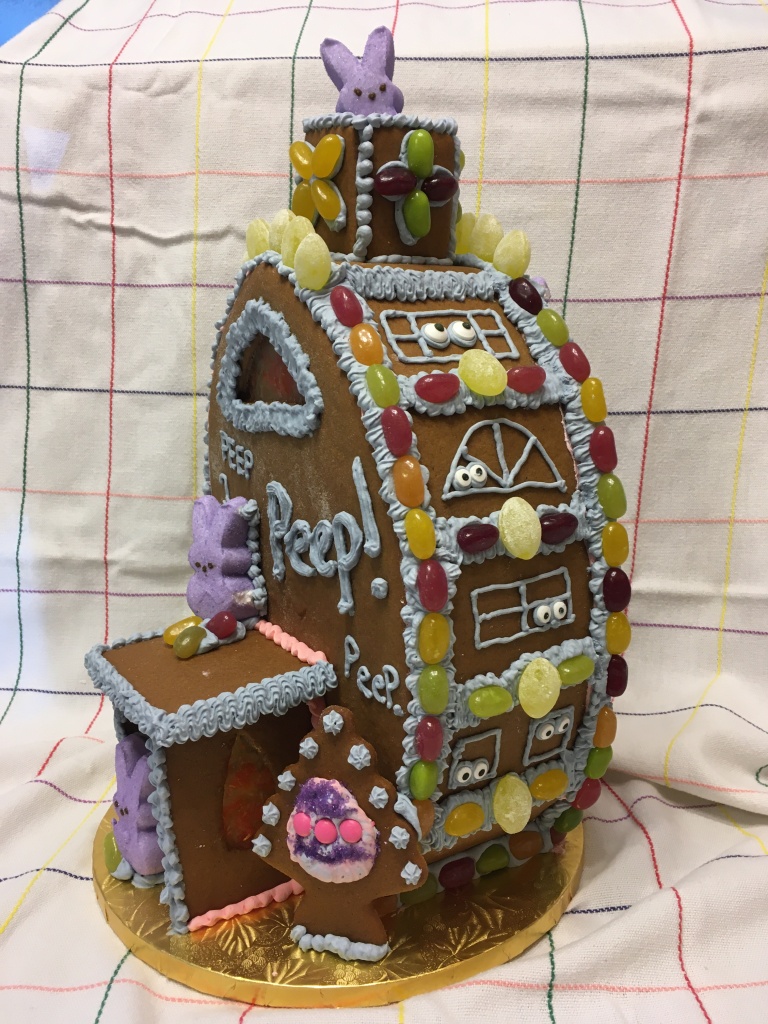
Back in April, inspired by graham cracker “Peep houses” my nieces made and fueled by social-distancing stir-craziness, I made my own Peep house out of gingerbread, swapping a friend some frozen tomatillos from my prior year’s garden in exchange for a needed bag of powdered sugar (baking supplies were often out of stock at grocery stores at that time). I freehanded and pieced together a design, and decorated it with candy I happened to have around the house, including the “Sport Beans” I bring on long bike rides. (Yes, I had candy eyeballs on hand, left over from a gingerbread haunted house project.)
Because I’d already made this gingerbread structure in spring 2020, I wasn’t planning to make another one for Christmas. There’s only two of us in the house, and without a planned disposition for the structure . . . man, that’s a lot of gingerbread to consume! I wanted to make a buche de noel instead. (Haven’t made one since high school French class.)
Besides, I didn’t really have an inspiring idea for a new structure to make.
Then a friend tagged me in a social media post.
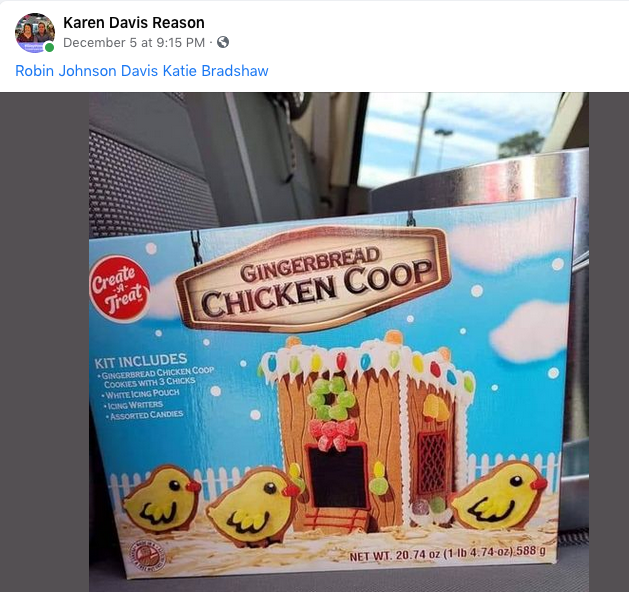
Aha! 💡
My spouse’s time-of-COVID project this year had been to build a really nice coop and run for our backyard chickens.
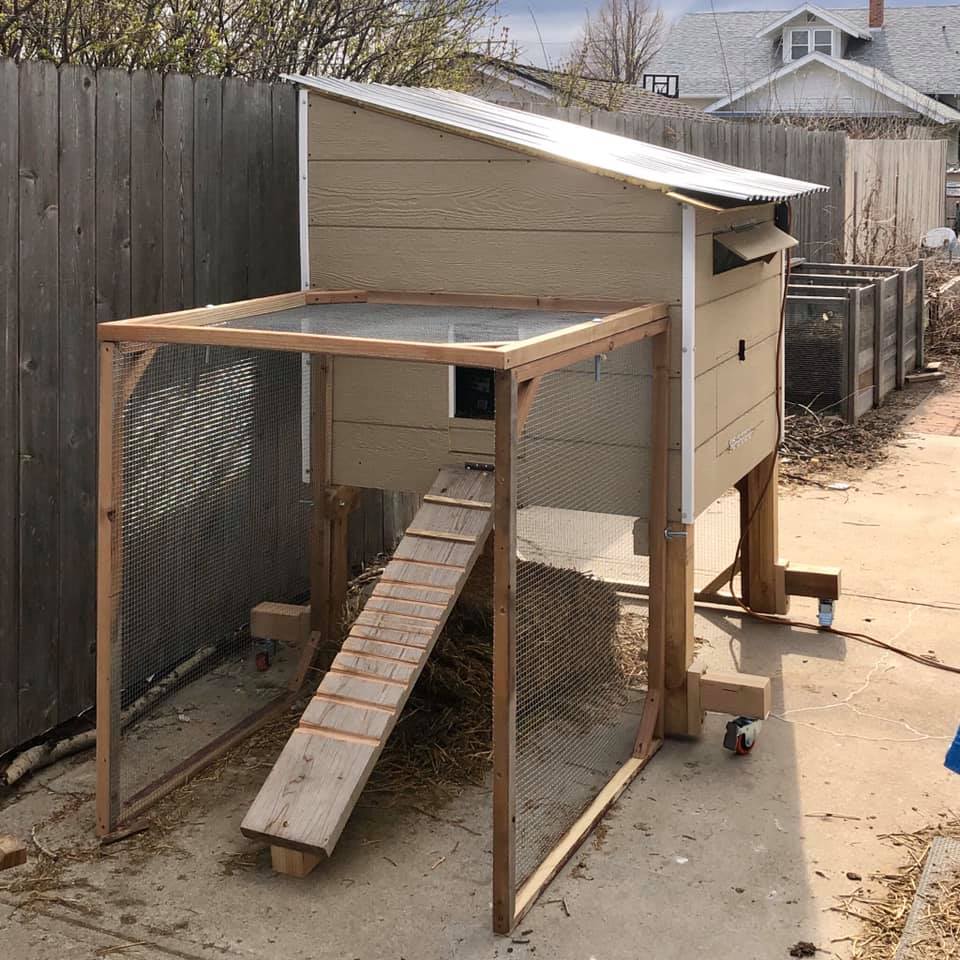
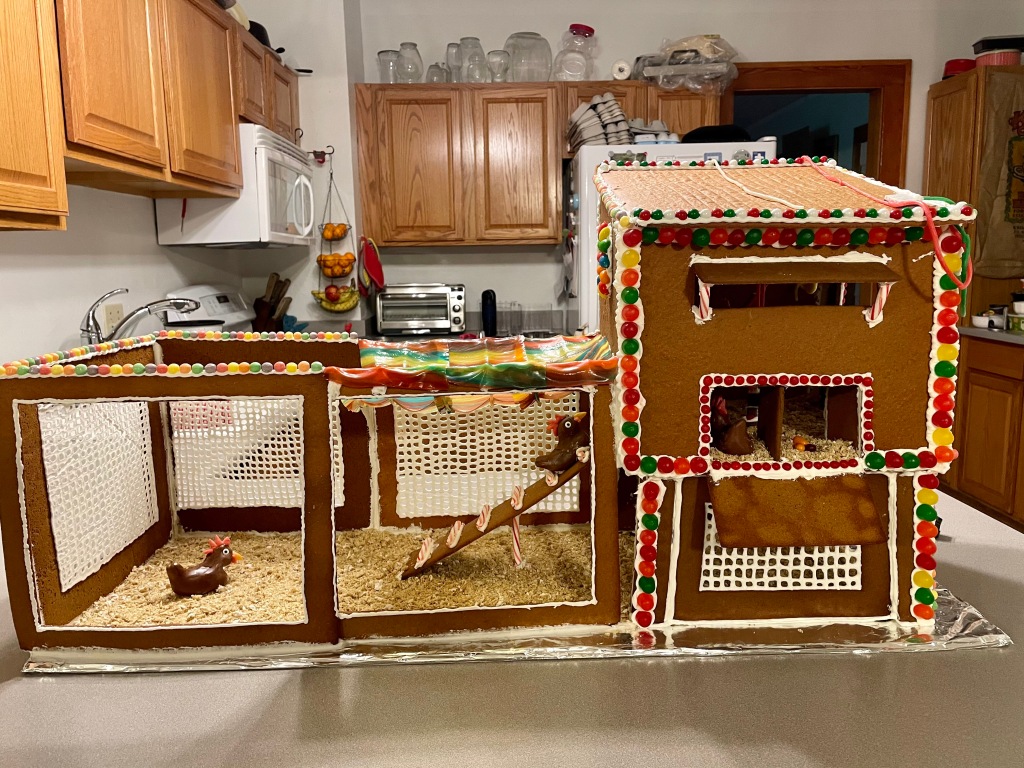
I could show off his work by modeling it in gingerbread! (And to make things even cooler, the gingerbread coop would be made with eggs collected in the coop the gingerbread was modeling!)
I took measurements and thought about it for awhile. Setting the scale at 4 feet = 12 inches would make for easy math. It would also make for a ridiculously large structure.
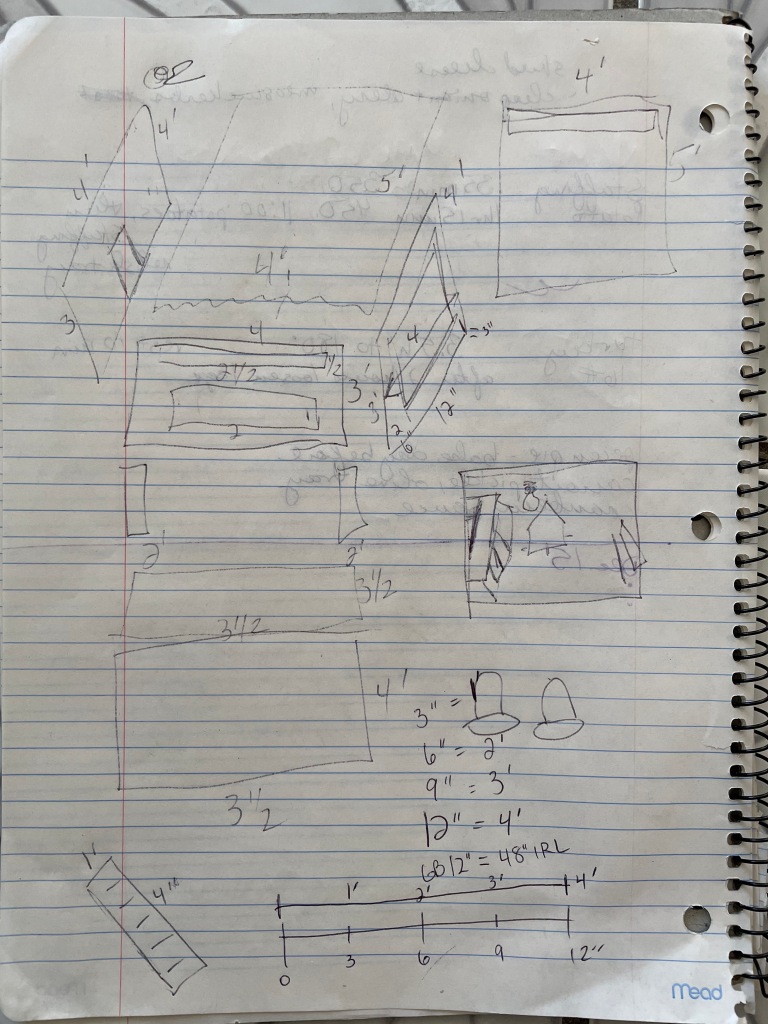
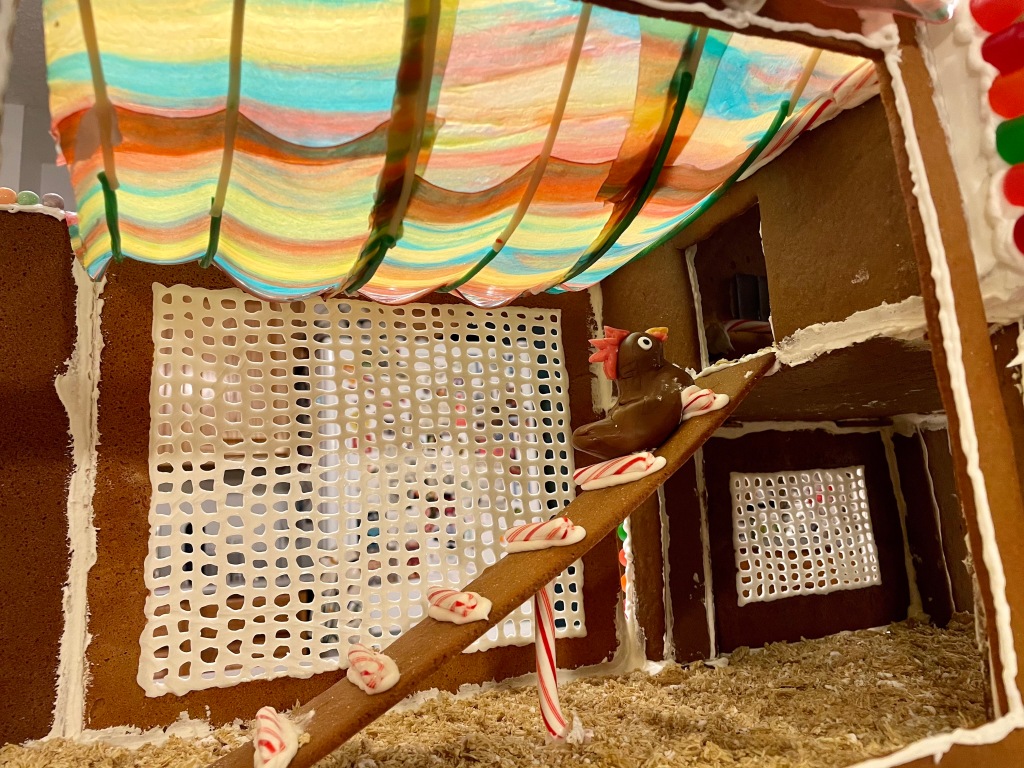
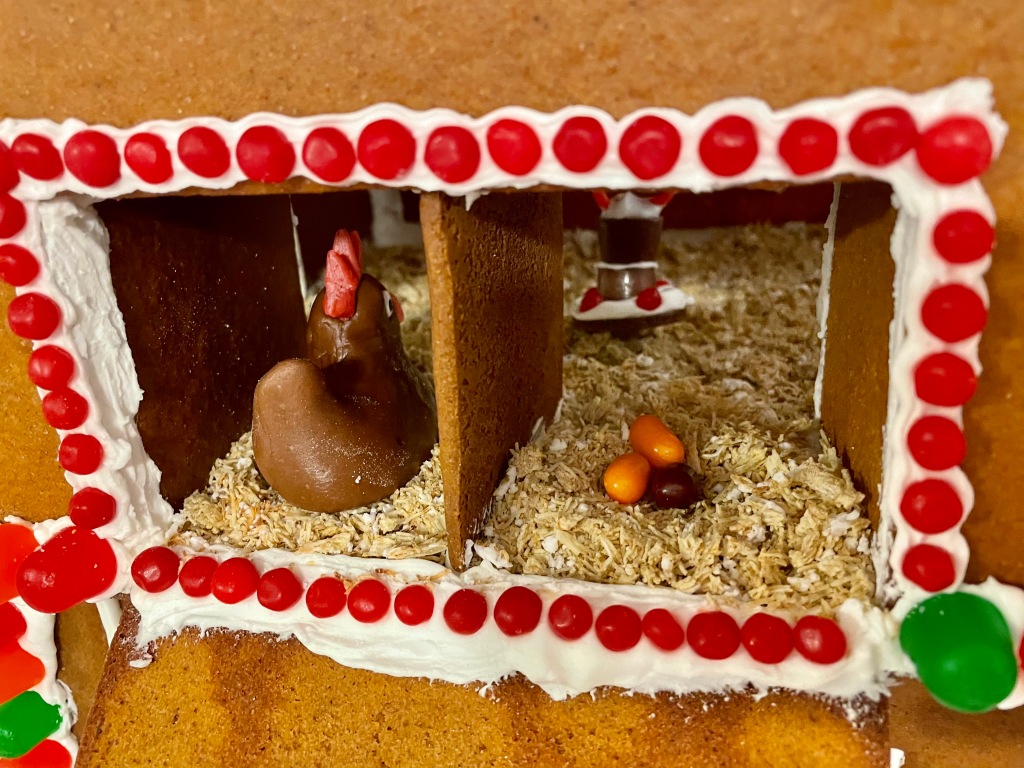
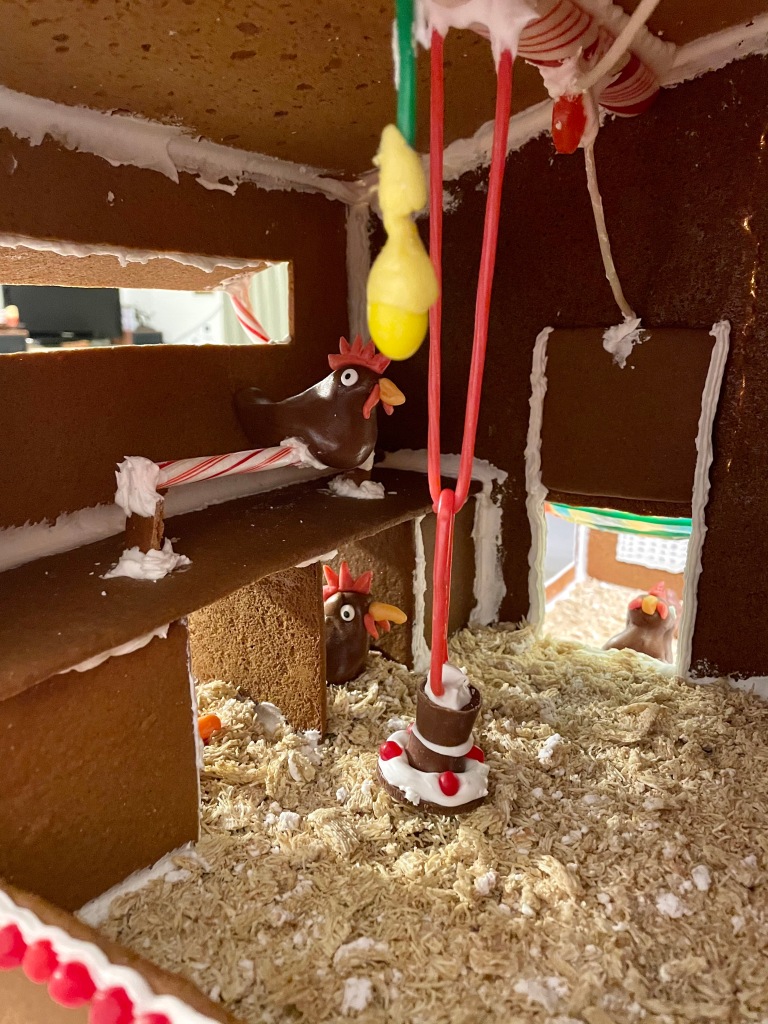
I started adding assorted candies to my grocery order, thinking about how I could represent the functionality of the real-life coop in my gingerbread model. I could use chocolate Jelly Bellys to represent the eggs! Maybe use peppermint patties and Rollos to create the feed and water dispensers. Pull-apart Twizzlers could serve as ropes and cords. How would I do the stilt-like legs? Pretzel rods? How would I represent the hardware cloth on the run? Could I fill it in with crushed Life Savers? Make it look like stained glass? Cover it with Fruit Roll-ups to represent the tarps that protect the chickens from wind and rain and sun?
I realized with the simple shapes, I wouldn’t need to use pattern pieces. I could just roll, measure and cut as I went along.

As is typical for COVID times, the grocery stores ran out of molasses the week I went to make the gingerbread dough. 🙄 Thankfully, a friend had extra jar in her cabinet and gave it to me. Full steam ahead! ✅
As I typically do with gingerbread structures, I rolled and cut out the largest pieces first, while I had the largest amount of dough available to work with.
And I discovered a problem.
The largest piece of my gingerbread coop was the roof – 15 inches by 12 inches. The largest cookie sheet I had that had thick enough construction to avoid warping while heating/cooling had an interior dimension of 16.5 inches . . . by 11.75 inches. None of the pieces of the coop structure that had more than one dimension greater than 12 inches wide would fit inside the pan! Aack!
My workaround: bake the largest pieces on the back of the cookie sheet, to eke out a few more fractions of an inch of support without pushing the gingerbread up against the sides of the pan. That would also allow the piece to be slid off the back of the pan directly onto the cooling rack, minimizing the flexing that can cause structural instability when the gingerbread is hot.

All was going well until I started re-using the foil by rolling out another gingerbread shape on the clean back – a practice I’d developed to conserve on the amount of materials I use. I’d forgotten that I should only re-use foil for smaller pieces. The foil under one of the big pieces of gingerbread stuck to the back of the cookie sheet, and I may have said a few bad words while trying to get it unstuck without damaging the gingerbread.
I got 10 pieces of gingerbread cut and baked, and I ran out of dough. I had to make another batch. Luckily, the grocery store had molasses back in stock by then.
I cut and rolled 13 more pieces. I also twice-baked the two largest pieces of gingerbread that would sit horizontally and be subject to gravity droop (the roof and floor of the coop), since the gingerbread seemed a tad on the “underbaked” side. I put a cooling rack in a cookie sheet, set the gingerbread on top of the cooling rack, and put it in the oven for 5-7 minutes. It dried out nicely and was much firmer.
Time to start assembling!
I had decided to use thick candy cane sticks cut down to 6 inches tall as the legs to support the coop, using plenty of icing as well as an extra scrap of gingerbread at the top to help distribute the load.
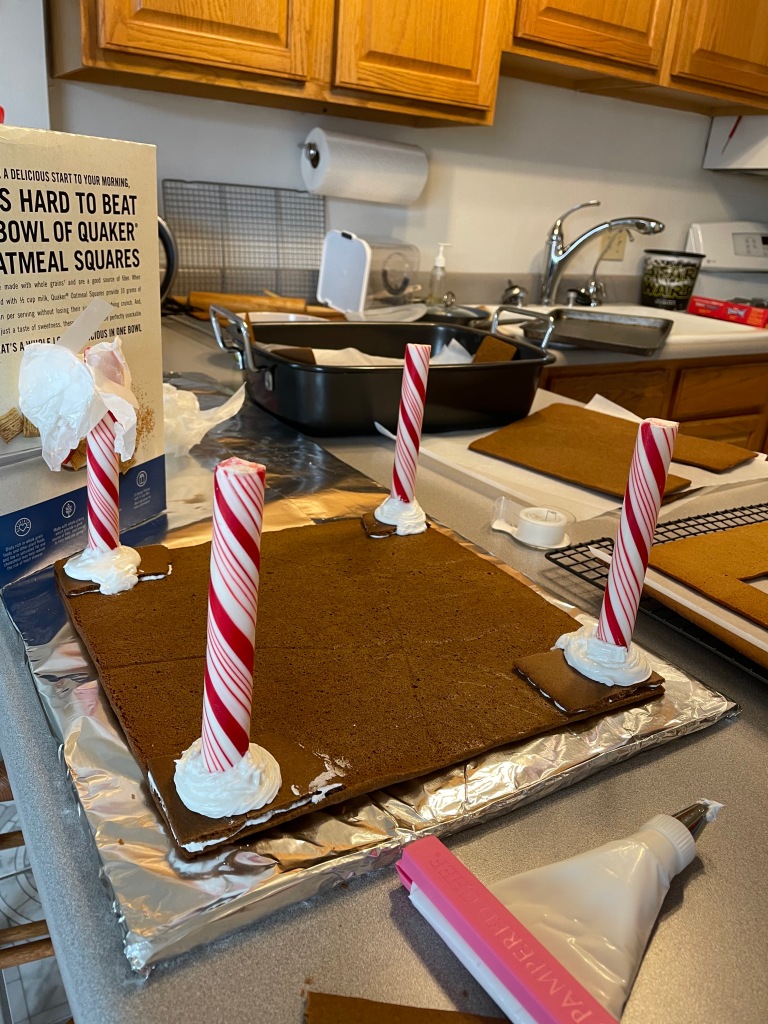
I knew this would be a critical step, so I left the structure to dry for 4 hours. (Usually, I can start building up a gingerbread structure within 30 minutes, but I wanted to make sure this would hold together.)
In the meantime, I took one of the frames from the chicken run, set it on top of some plastic wrap, and piped icing onto it to represent hardware cloth. (I had decided during the baking process that a 10-by-8.5-inch space was just too large to fill with melted Life Savers.)
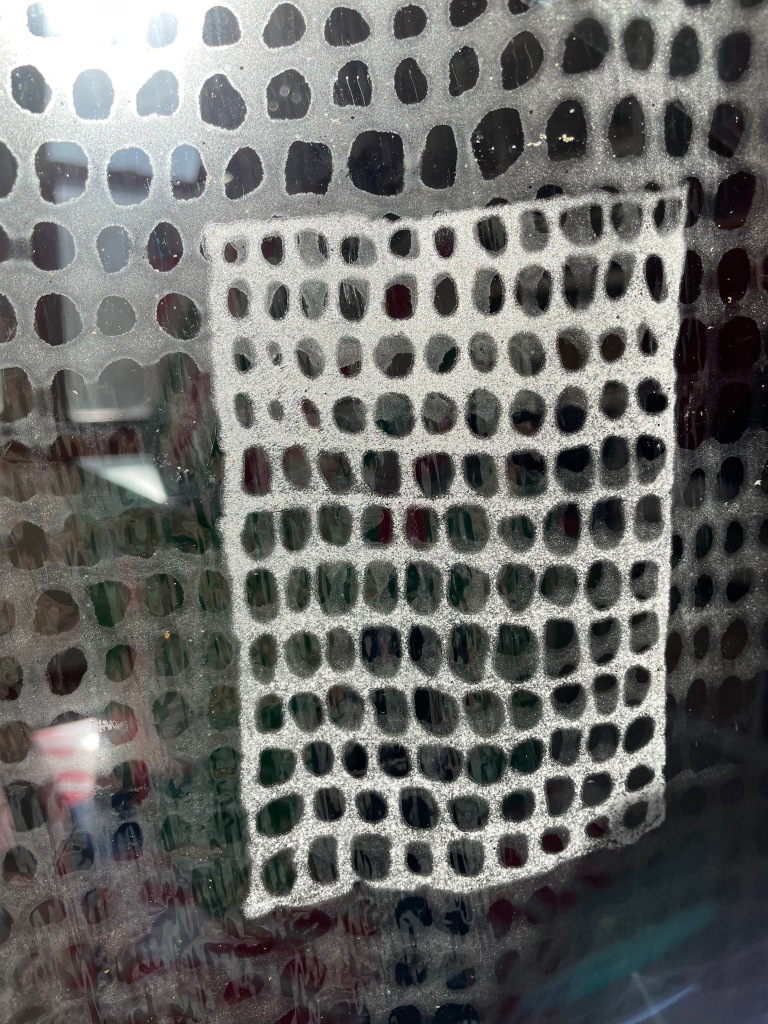
By the time I was done piping the hardware cloth, my hand was so tired, I vowed to try using “windowpane” pretzels for the rest of the run. Unfortunately, the grocery stores ran out of that pretzel shape (too many people making holiday snack mixes and Rollo “turtles”?), so I wound up piping two more frames to complete the back and side of the run and called it good.
Moving on with the construction . . . things went well, until they didn’t.
I set the coop base upright and cemented it to the cardboard/foil platform. I added one wall, two walls, three walls – so far, so good. I iced in the nest box structure.

I put the fourth wall on, which required a little finagling, because one of the other walls had gotten slightly cracked after it bent while it was still hot after baking, and I had to apply some pressure for it to make contact with the icing on the fourth wall . . . and suddenly everything was moving.
NOOOOOOOOOOOOO!
I’m lucky the structural failure turned out the way it did. The icing at the tops of the candy cane pillars had NOT hardened, and all four slowly let loose at the same time, causing the structure to slide sideways. Because I happened to have two hands on the structure at that moment, trying to press the walls together, I was able to help control the fall, and the coop landed upright, on top of the tipped-over pillars, which thankfully had fallen onto the countertop and not off the edge and onto the floor. I had my husband help me lift the structure off the tipped pillars onto a sheet of waxed paper, to let things set up while I regrouped.
Note: do not use hard candy – especially not peppermint sticks – as weight-bearing structure in gingerbread! The candy sticks had turned to slime where they contacted the icing. I guess that makes sense – I think the icing in contact with the gingerbread dries so quickly because the porous gingerbread helps wick away the moisture. The peppermint sticks did not. In fact, based on having tried to stir a cup of hot chocolate with a peppermint stick, if the candy had wicked the moisture, it might have weakened the candy’s structure. Maybe it would have hardened if I’d left it for a week. But I was not willing to have my kitchen unavailable for that long. (In retrospect, I bet the peppermint stick legs would have worked if I’d cut circular holes in several squares of gingerbread to receive the candy stick, and stacked them together and let them dry before inserting and cementing the candy stick in place.)
Back to the drawing board . . . Maybe I could use graham crackers? Mmmm . . . kind of crumbly. Or go back to the pretzel rod idea, cementing several of them together for stability? I placed a grocery order for pretzel rods (plus enough additional items to reach the minimum order cutoff). In the meantime, I decided to make another half batch of gingerbread, just in case. Probably would be a better idea to have square legs? Maybe cut pretzels wouldn’t be strong enough?
Good thing I’d decided to make more gingerbread. Turns out the store was out of pretzel rods. Argh. #COVIDtimes
With the coop structure well set, I cemented the roof in place. While that was drying, I cut, baked, cooled, and assembled four four-sided pillars to serve as the coop legs. I gently flipped the coop onto its roof, cemented the legs in place, and let it all dry overnight.

I still wasn’t trusting that the four legs would securely hold the weight of the coop plus decorations, so I used the remaining dough to make additional “hardware cloth panels” to anchor between the front and back sets of legs, to help prevent torquing.

I gently inverted the coop back onto its feet and . . . it stayed up!
Bit by bit, I added details to the structure, propping them up with whatever was at hand while they dried.

Finally, around 8pm on December 23, a full week after I’d begun work in earnest, the gingerbread chicken coop was done!
Allow me to give you a tour!


So that’s it. That’s the full tour.

I’m writing this post four days after the coop construction was completed. Some of the Dots are starting to fall off the structure. The tarp roof is sagging and starting to pull on the walls of the run and bow them inward. Time to start eating this thing!
Anybody want some gingerbread?? I’m more than happy to share!!
PS – every bit of this gingerbread chicken coop is edible, with the exception of the cardboard/foil base. It’s a rule I work under – everything must be edible! I get scornful when I get excited about a really cool gingerbread structure, only to learn that it’s “not edible” because it was assembled with glue. Glue?? Why would you do that, when edible royal icing holds so firmly?
Copyright 2020 by Katie Bradshaw

This is, by far, one of the coolest gingerbread structures I’ve ever seen. I love your little chickens – they are such fun.
LikeLike
Haha thanks. It’s for sure nerdy. 🙂
LikeLike