Preserving Eggs with Water Glassing

Back in June 2019, Bugman got a wild hair and bought four chicks and a coop for our backyard.

We got our first egg in January 2020.

By May, we were getting four eggs most days.

There’s only two of us in the house, so the eggs really started to accumulate, overflowing the storage space in our fridge. Thanks to our travels in other countries and learning different ways of doing things, we knew that eggs can be safely stored at room temperature, provided they do not get wet and their natural protective coating (called “bloom”) is intact. (We dated each carton and rotated to use the oldest stock first. Also, if it was cold outside and the eggs risked getting condensation when we brought them inside, they went straight into the fridge.)

The photo below shows some eggs we bought, unrefrigerated, at a grocery store in Costa Rica. This took me a long time to trust, since the only rotten-egg experience I’ve ever had was from eggs we bought at a farmer’s market in Iowa, where the sellers clearly did not know what they were doing. I complained about the rotten eggs they sold us, and they gave me a replacement dozen the next week, which were also rotten. Nasty-smelling, runny greenish eggs – YUCK! I will NOT eat green eggs, thankyouverymuch, Dr. Seuss.

We gave some of our excess eggs away to friends and neighbors, but the eggs kept coming. Summer is a bounteous time for backyard egg production, but the shorter day length of winter would mean our chickens would probably slow or stop laying. If we wanted to use our own happy chickens’ eggs throughout the winter, we’d have to find a way to preserve them longer term. There was also the matter of the pandemic, and me feeling the need to store up food in the event that supply-chain problems happened again. I started looking up methods of egg preservation.

I trust university Extension advice on food safety, as they distribute scientifically-rigorous, evidence-based information. But the only non-pickling preservation method I found was to freeze the eggs, which didn’t appeal to me because our freezer was getting filled up with garden vegetables, adding to the volume of fish and fowl Bugman had previously caught and hunted. Plus, the freezing instructions I found said to add sugar or salt to stabilize the egg yolk. I need to reduce my dietary salt for health reasons, and adding sugar meant I wouldn’t be able to use the eggs for any of my typical recipes, so I wasn’t keen on this preservation method.

I tried it anyway without the sugar or salt, breaking and scrambling four eggs into a container, freezing them, and taking them out 4 months later. The result made me a little queasy. The eggs took on a gelatinous, pudding-like texture. They were fine for scrambling, but just overall, not a great egg storage solution for me.

Then I found some information online about “water glassing” as an egg preservation method. There was no Extension-tested method I could find, but it’s apparently time-tested. A friend commented on a post I made about the technique:

I think my grandma talked about WW2 days when eggs were hard to find – never knew when you could “arrange” for some, and said they kept some in the cellar in a big barrel full of “something”, and she would go “fish” for them when needed.

Water glassing involves storing the eggs at cool room temperature in an over-saturated mineral solution — specifically calcium hydroxide, AKA pickling lime. I’m using the term “over-saturated” to mean there is more of the mineral than will dissolve in the water. I assume the mechanism of preservation is that the calcium will deposit on the eggs in the solution and seal up the pores in the egg to keep it from drying out. A “not fresh” egg will float in water, because moisture in the egg will slowly evaporate out through the shell, and air will slowly move in. (The online commentary on water glassing says not to use eggs preserved this way to make hard-boiled eggs without piercing the shell first, because pressure will not otherwise be able to escape, and the eggs will crack/explode when cooked.)

I followed the advice from Carolyn Thomas at homesteadingfamily.com for my water glassing experiment.

  • Make a solution of pickling lime (I bought mine at bulkfoods.com) with 1 ounce by weight pickling lime per 1 quart water. I used distilled water, since I didn’t want to take any chances with our softened-hard tap water that sometimes reeks of chlorine.
  • Put the solution in a food-safe container that has a tight cover. I re-used an emptied and washed 25oz pretzel jar.
  • Choose clean, fresh eggs that don’t have poop, feathers, or nesting material stuck to them. DO NOT WASH THE EGGS before you put them in the solution.

I gently lowered the eggs into the jar using a pasta scoop. I did not want to get that solution on my skin, since a calcium hydroxide solution is quite basic (according to wikipedia, pH of 12.4, about the same pH as household chlorine bleach, which is basic enough to cause chemical burns – don’t get it in your eyes, kids).

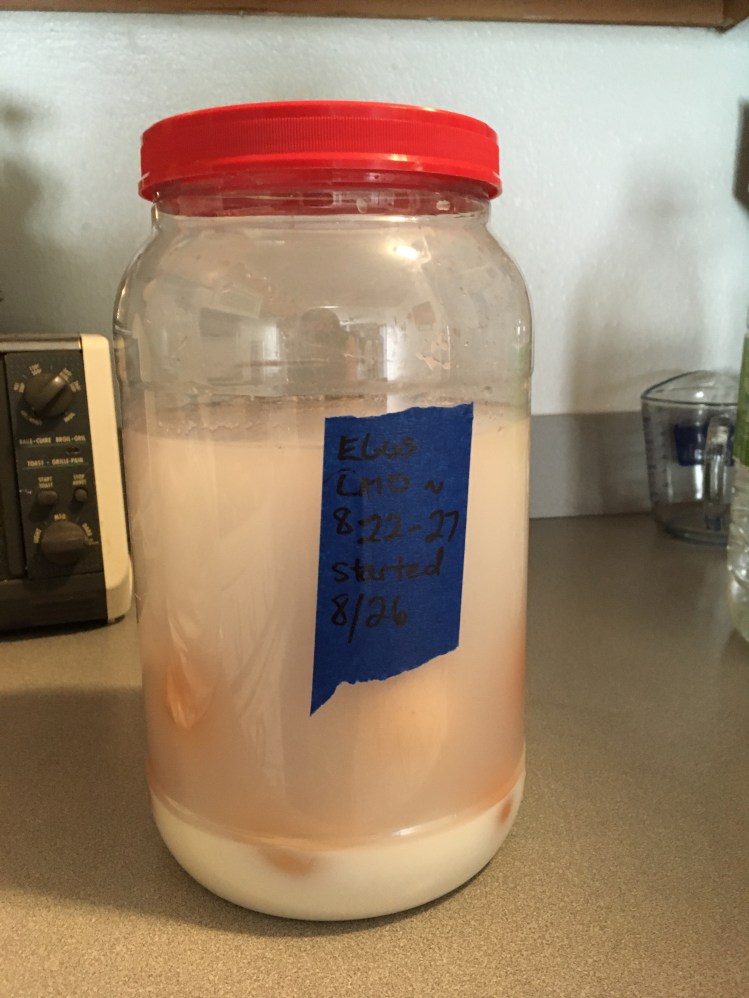
I kept adding fresh eggs until the jar was fairly full. Then I screwed the lid on, labeled the jar, and put it in a dark, cool corner of my basement. Note that because of the over-saturation of the solution, there was undissolved pickling lime at the bottom of the container.

Then, I waited.

Round about December, our household egg needs were exceeding the chickens’ output of maybe an egg a day.

I brought the 4-month-old jar of eggs up out of the basement and took off the lid. No funny aroma or anything, but it looked like we’d had some evaporation out of the container, as a solid crust of calcium hydroxide had built up on the surface.

I used the pasta scoop to pull out an egg, and then rinsed it off. I cracked a freshly-laid egg into a dish, and then cracked open the 4-month-old “water glassed” egg. The main difference I could see was that the egg white was runnier on the older egg (at left) than the fresh egg (at right).

I’ve used these water-glassed eggs for making fried eggs, scrambled eggs, and baked goods, including separating the egg whites and beating them to stiff peaks, and everything has worked out just fine.

I’d say the only downfall I’ve come across with this method is that the membrane around the egg yolk seems more fragile, so it’s harder to crack an egg without breaking the yolk.

We’ve not run into any food safety problems with this method that we’re aware of. Still, I would feel more comfortable recommending it if I knew it was scientifically tested. If anyone knows of any bona fide scientific food safety references about water glassing, please send them my way. I’m also curious about whether this preservation method changes the pH of the egg.

Copyright 2021 by Katie Bradshaw

First Day Hike

I’d kind of wanted to do a First Day Hike. I’ve done them before. But these days I seem to be fighting a molasses-esque inertia. A hike would be a good idea, but would also require planning and effort.

Well, social media struck again! A friend messaged me:

I enthusiastically agreed to tag along. (You’d think I wouldn’t have a life or any ambition without Facebook. And, sadly, in this age of the pandemic, it may not be far off the mark.)

I just hoped the hip that has been giving me trouble would hold out. (Spoiler alert: it was fine.) And I grumbled a bit at the 9:30am start time, given the likelihood of poor sleep on New Year’s Eve, on account of the stupid, loud fireworks. (Fireworks up to 50mg including “star and comet type color aerial shells without explosive charge for the purpose of making a noise” (emphasis mine) are legal for the general public here at Independence Day and New Year’s Eve. I suspect people go across the border to Wyoming to buy the larger, louder ones. It’s one of the things I loathe about living here.)

I re-remembered how to get to Cedar Canyon (I’ve written about hikes there in January 2012 and November 2015), and Bugman (my spouse) and I headed out with our cell phone cameras and backpacks with water, snacks, and clothing layers, arriving in the parking lot at 9:30 on the dot, after a slight delay caused by a car ahead of us having stopped in the middle of the road. (Maybe they saw the bighorn sheep?)

It’d be me, Bugman, Steve (my former editor when I wrote for the newspaper), and Irene (also a former newspaper reporter – she wrote about the hike here). Three recovering newspaper journalists and an entomologist. That’s got to be the start of some kind of joke, right?

We headed out on two-track for a ways before veering off towards a “game trail” Steve had discovered in satellite images — a human-navigable way to get up the steep incline to the top of the bluffs.

The “rock with a face” confirmed we were heading the right way.

It was not an easy hike up to the top. The air temperature was hovering around 34 degrees, but I shed my vest, hat, and mittens on the way up. The trail was on the shady side of the bluff and covered in the sort of snow that won’t give your feet any purchase. Piles of ponderosa pine needles underneath didn’t help with the traction. Yucca leaves stabbed through my pants.

The slope was steep enough in places that it felt more comfortable to scrabble upwards in a crawl. (I have more photos of this climb, but I was last in the climbing line, and I was taught as a journalist not to use pictures of people’s backsides.)

I forget what Steve was saying in this picture: “you’re almost there” or “what took you so long?” But I can read Irene’s expression: “do you believe this guy?”

Here’s a selfie with the view from where I was standing in the above photo. “Almost to the top!”

We stopped for a quick rest while scanning some rock-carved graffiti. Clearly it’s not a secret trail.

Group photo! You can see the shadow of the tree snag holding my phone. I tried to get a second shot at a different angle, but my phone fell out of the tree and started to tumble end-over-end down the slope. I’m glad it stopped tumbling! (Also glad I have a tough, waterproof phone case!)

So many strange and interesting pipy concretions! (Here’s all you’ll probably ever want to know about pipy concretions.)

Bugman strikes a pose with a deceased pine tree.

Here we go out onto my favorite part of this hike. This dry shelf, which had no trees or yucca (but did have piles of “sheep beans”), really captured my imagination with all the odd rock formations and colorful lichens.

I got kind of disoriented on this hike, and I’m not sure I could find this place again, but I’d like to try. I want to just hang out here.

In the photo below Scotts Bluff National Monument and the recognizable shape of Dome Rock are visible in the distance. (The Scottsbluff sugar factory, too, if you have really good zoom). The rocks scattered on the ground here looked to me like the fossilized bones of the earth, drawn to the surface by weathering.

Check out this ball mound of a plant that’s held this patch of earth together for probably decades. I feel like I should know what plant this is. Sandwort?

Those beautiful orange lichens! And that blue sky! A friend of mine once told me that the combination of blue and orange in art represents hope. One could sure feel hopeful being out in nature on a day like this.

Seriously, look at these rock shapes. One made me think of a seahorse. Another, an idol of some sort.

So interesting!

All along our path of travel on the top of the bluff we found bobcat tracks in the snow. At one point, the tracks did a crazy backwards twist alongside some rabbit tracks, and there were signs of some kind of action. Didn’t see any signs of a kill, though.

We did see some bighorn sheep down below in the valley. They didn’t seem too keen on being spied upon from above, and they took off running. Later, on our hike back along the ridgetop, we’d find some bighorn tracks superimposed on top of the tracks we made in the snow on the way out.

This is just the strangest thing up there on top of the bluff. A well-tied down cage, with the weathered polyester netting repaired with bits of camo-green polycord, two sides blocked at the bottom with pieces of plywood, that has clearly been there a long time. I couldn’t discern a door. If anyone can tell me what the heck it’s for, please comment!!

Time to head back, across the ups and downs of the bluff top, and then DOWN DOWN DOWN off the bluff, slipping and sliding on the snow and pine needles and colliding with yucca leaves. Luckily I never collided with a prickly pear patch, but I think some of them weaseled their way into Irene’s boots. I commented during the hike that, were I solo, I would have turned back long prior. I’m not in the best shape. My legs were getting weary-wobbly. I fell once and hyperextended my wrist, but the pain shook off in a minute or so.

My brain was getting weary-wobbly, too. I spotted a small piece of moss on the side of a tree as I descended and decided to name it Bob.

Bob Moss.

(As a friend later commented, Bob Moss must have been growing on a happy little tree.)

But despite all the weary-wobbliness, I made it! Some 8.5 miles on uneven, hilly terrain.

I went home, changed out of my wet socks and dirty pants, ate a bunch of food, and took a nap on the couch.

A great start to the year, grateful for health, nature’s beauty, and the socially-distanced companionship of fellow weirdos.

Copyright 2021 by Katie Bradshaw

2021 Crafting Project: Precipitation Scarf

Several years ago, I can’t remember where, I read about people who were knitting or crocheting “temperature blankets” to illustrate the local effects of climate change by coding the yarn color of each row of the blanket to each day’s high temperature. I loved this colorful idea! Smithsonian Magazine and the New York Times covered the phenomenon early in 2020. A scientist used crochet to illustrate temperature data in a conference poster in 2017. (I love this so much!)

Here’s a screen grab of what comes up in an image search for “temperature blanket”. So colorful!

I’ve crocheted a little in years past (my mom taught me the simple single stitch), but I’m not much of a fiber artist, so I never considered doing one.

Well, social media happened again.

A friend posted about the new yearlong challenge she was taking on: a temperature blanket! And some others of her friends were also planning to give it a go. I commented that I didn’t think I’d have the patience for a blanket, but thought a scarf might be doable. “Join us!” she said, and tagged me in a post about her “data visualization crocheting quest.”

That color palette is so choice!

OK, challenge accepted!

But, instead of doing temperature, I decided I wanted to log each day’s precipitation.

Here in the semi-arid High Plains, we don’t get a lot of moisture – just 15 inches a year, on average. Agriculture is able to thrive here thanks to the storage and distribution of snowmelt from the mountains to the west. Rainfall is often an EVENT. We keep a close eye on precipitation here. I’ve taken on these habits myself, often recording in photographs the rain, snow, and hail that fall at my house and sharing them with the Cheyenne National Weather Service.

(If you’re curious about that last picture, it’s featured in this blog post.)

As long as I’m making these observations already, I might as well crochet them into a scarf, hey?

I figured I’d represent rainfall in shades of blue and snow in shades of purple. Red for hail or graupel. I don’t want there to be red/hail in my scarf, but I know there will be. There always is. *sigh* I’m ok with graupel, tho. (Graupel is officially my favorite meteorological term.) In this arid climate, most of my scarf will be “no precip” – I decided I’d like a charcoal gray. And maybe a blended yarn of blue and purple to represent mixed precipitation?

Before going in search of yarn, I needed to figure out what sort of scale to use. I looked up rain data for the April-July period (using Weather Underground’s by-month daily history) and sorted the non-zero days into likely blocks. The snow was more variable, so I looked at Oct-Apr for 2019 and 2020 on the Daily U.S. Snowfall and Snow Depth reports from NOAA to get a sense of where to draw the boundaries.

Here’s what I came up with, measurements to be taken daily at 7am:
RAIN < 0.1″ = light blue
RAIN 0.1 – 0.5″ = medium blue
RAIN > 0.5″ = dark blue
SNOW < 1″ = light purple
SNOW 1-3″ = medium purple
SNOW > 3″ = dark purple

Then I went shopping . . . and came away a bit disappointed. The only yarn type that had the range of blues and purples I wanted didn’t have a charcoal gray in stock. I got a lighter gray with silver metallic threads instead. And no blue-purple blend, either. Oh well. That was probably too complicated anyway.

I still don’t know what I’m going to do on days with mixed precip, or on days with hail/graupel, since those will usually be accompanied by other precipitation. Crochet two rows? Weave a colored thread through the row? I’ll figure it out when I get there!

Here’s my “data visualization crocheting quest” colors and key:

The precipitation recorded at my house for January 1? Nada. The scarf begins in gray with silver sparkles.

I will perhaps updated this post when something exciting happens. (Like when I figure out what to do about those mixed precip days!)

UPDATE 2/1/21:

So, a month into this crochet project, I started over!

Here’s the old one, which I didn’t like:

Here’s some commentary:

  1. Turns out I was already starting to run low on my “no precip” color, and I heard it had been discontinued! Oh well – I didn’t like that color anyway. I bought some charcoal gray in another brand, and I like the look much better.
  2. Turns out I hated how the red for graupel / hail looked with the rest of the colors. By using charcoal gray for the “no precip” days, it freed up the sparkly light gray for graupel / hail instead.
  3. Those mixed precip days – I had one day that was a mix of rain and graupel. I used the light blue for the rain and wove the color for the graupel into the stitches when I was done. I tried crocheting both yarns together, and I thought it wound up too bulky / inconsistent-looking.
  4. I didn’t like the width of the scarf – too wide, so I made it narrower.
  5. With 31 days down, at 8.5 inches long already, this is going to be a LONG scarf – like 8 feet! That’s OK – all the better to wrap with, my dear!

Here’s what the current scarf looks like:

Copyright 2021 by Katie Bradshaw, aside from the screen grabs of the temperature blanket images