My Analog Collage Gluing Technique

Back in December 2017, I entered a coffee cup decorating contest at a local coffee shop. I don’t have much in the way of painting or drawing skills, so I decided to do a collage design. I got out a pair of scissors, some magazines, and a can of spray adhesive, and I was quite pleased with how my cup turned out. (I did not win the contest.)

In March 2018, I decided to take a collage class offered at our local arts center. I can’t now recall or find the teaching artist’s name. What I do recall from the class was the “intuitive” image-gathering technique (you just go through magazines and clip/tear whatever speaks to you), the different techniques for tearing paper to produce a white edge (or not), and that we used a paste called “yes”.

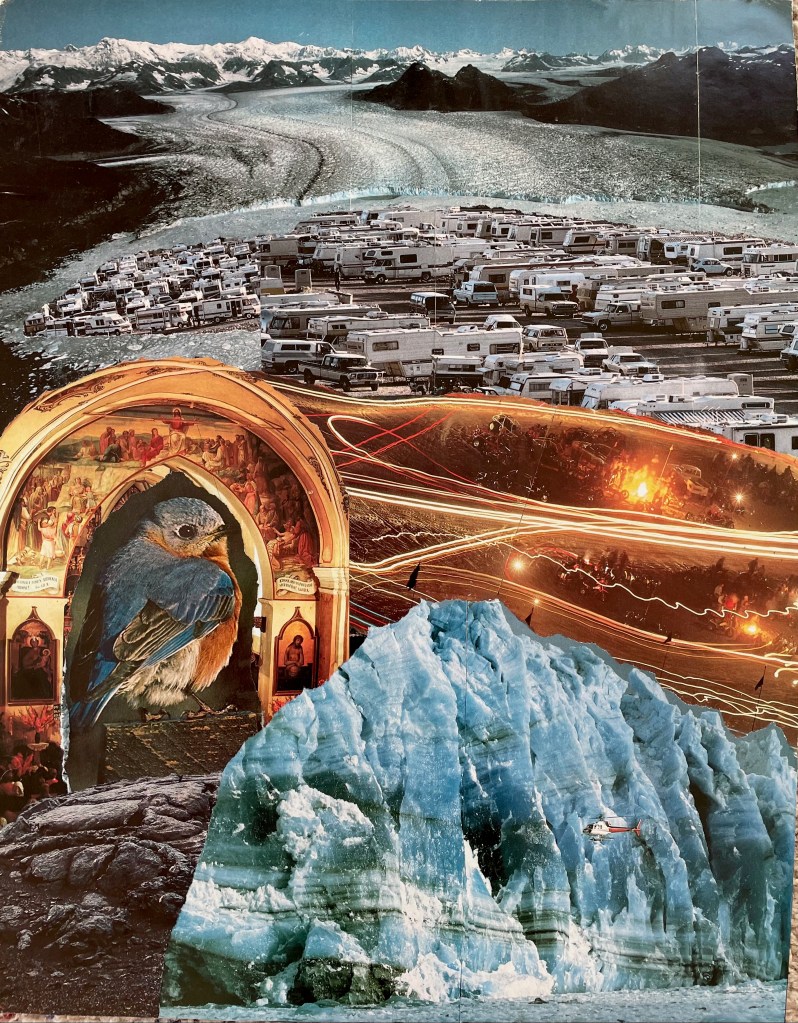
Here’s the piece I started in the class and finished 2 1/2 years later (because I can rarely finish this kind of work in class – too much perfectionism): “Fire & Ice: Climate Change”.

I loved how it felt to make collage, how it felt when images “clicked” for me, but I didn’t pursue it beyond the class.

Then in October 2020 (oh, 2020!), I started another collage project as the result of an assignment in “The Artist’s Way” book, which I was undertaking as a writer. I remembered the paste brand I’d used in my collage class, but couldn’t remember the application technique. I turned to the Internet, and I cobbled together a technique, which I have been refining as my interest in collage work has increased.

I wanted to share here what I have learned about gluing, in case someone else is interested in working with analog collage but didn’t know how to get started.

My tools:

  • a tub of “YES!” paste
  • an old credit card or similar bit of stiff plastic with a straight edge
  • a damp microfiber cloth and a dry washcloth
  • “neatness mats”
  • a small, pointed wooden dowel and an x-acto knife

My process:

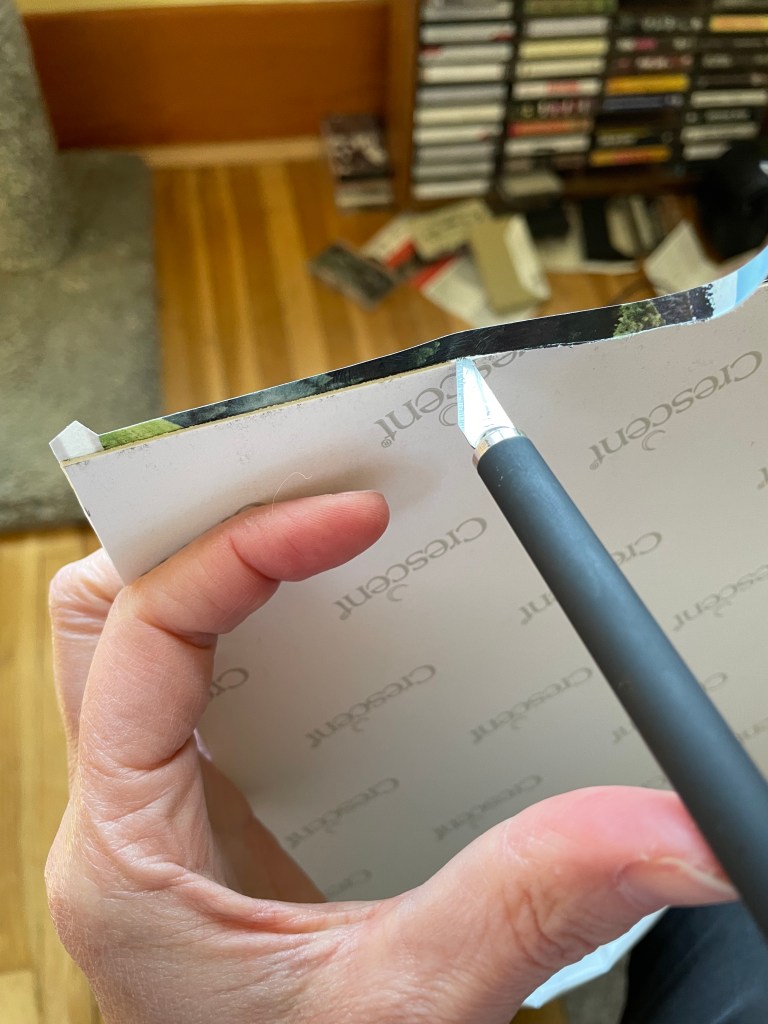
Step 1: arrange images how I want them on my collage board, then carefully start picking up the topmost layer of images and setting them aside in a pile, so the topmost / last images to be placed end up on the bottom of the set-side pile. Use pencil or marker to note where the edges of the pieces should go.

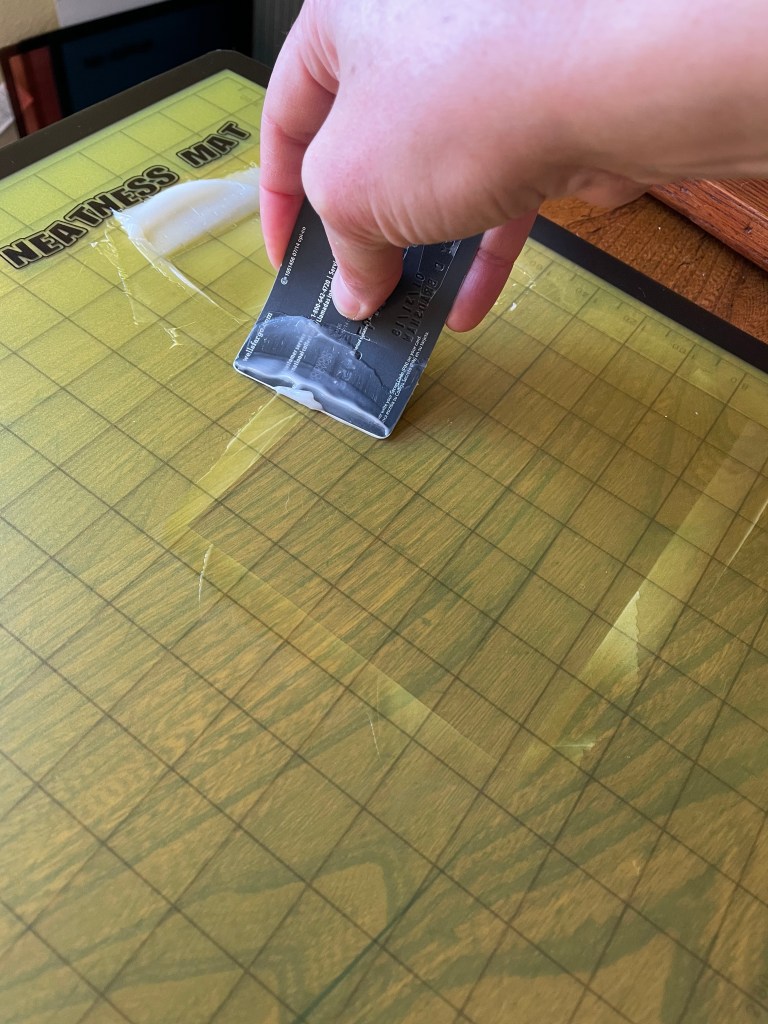
Step 2: use credit card to put a glob of YES! paste on the neatness mat, and mix the paste around a bit. I have found that the paste spreads better when it’s worked a little. Also, sometimes the paste in the jar is too dry, and I’ll add a sprinkle of water to the jar at the end of a work session, so it’s a bit more workable the next time I go to use it. I try to remember to keep the lid on the jar as I’m working, too.

Step 3: place an image face down on the neatness mat. While holding it in place with one hand, use the credit card to spread a thin layer of paste on the image in the direction opposite of where you are holding – paying particular attention to getting paste out to the edges. Be careful not to let the image shift on the mat, or you’ll get paste on the front of it. Reset your holding hand and spread paste in the other direction to finish coating the image. Getting the right thickness of paste can be tricky. You don’t want too thick a layer, or it will bubble the paper and ooze out and make a terrible mess. Too thin a layer, and it either dries out and won’t stick, or it sticks and stays immediately and won’t give you any time to tweak the image placement. The type of paper the image is printed on as well as the material of your substrate will affect the behavior of the paste.

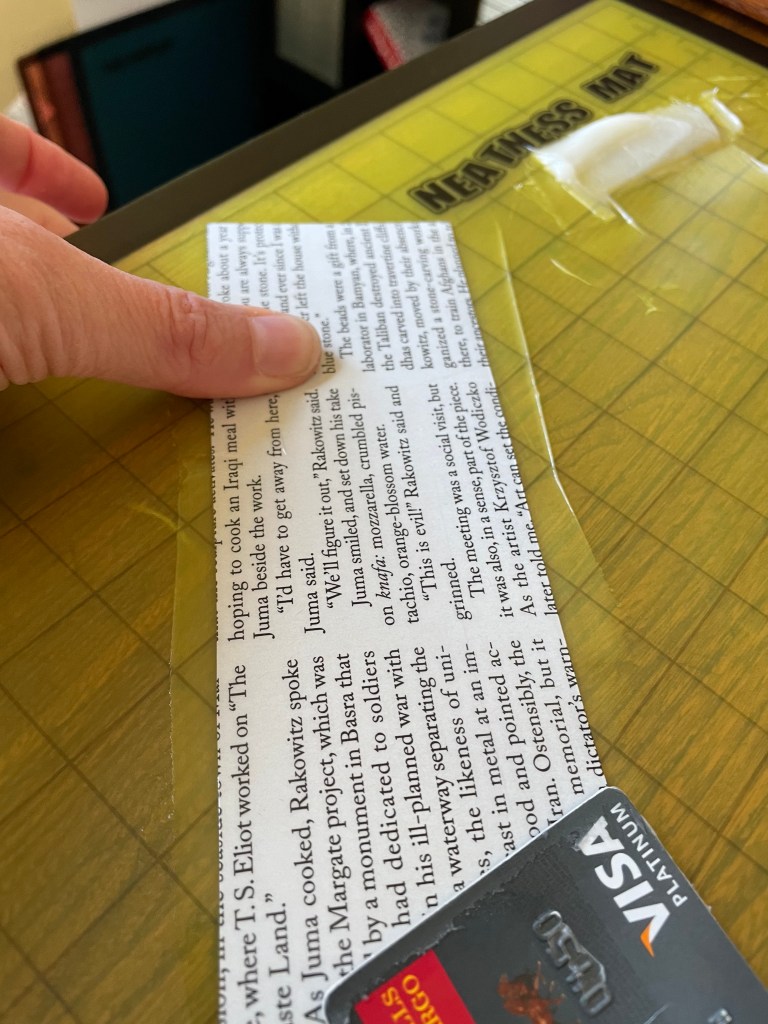
Step 3, tip 1 – have a damp cloth and a dry cloth on hand to wipe your fingers off as you’re placing the glued image. You will inevitably get glue on your fingers. If you wipe them off as you work, you can reduce the amount of cleanup and potential damage to your images. (Tip for pet owners: make sure these cloths are as free of pet hair and lint as possible. Otherwise, that fluff is going to get onto your glue-sticky fingers and then become a part of your artwork.)

Step 3, tip 2 – use your credit card tool to scrape up and re-use paste left behind on the mat.

Step 3, tip 3 – shift to a clean portion of the mat, or use a clean mat / clean side of a mat, for each piece glued, so you don’t get glue on the front of the image or accidentally lose part of the image if it sticks to the glue on the mat.

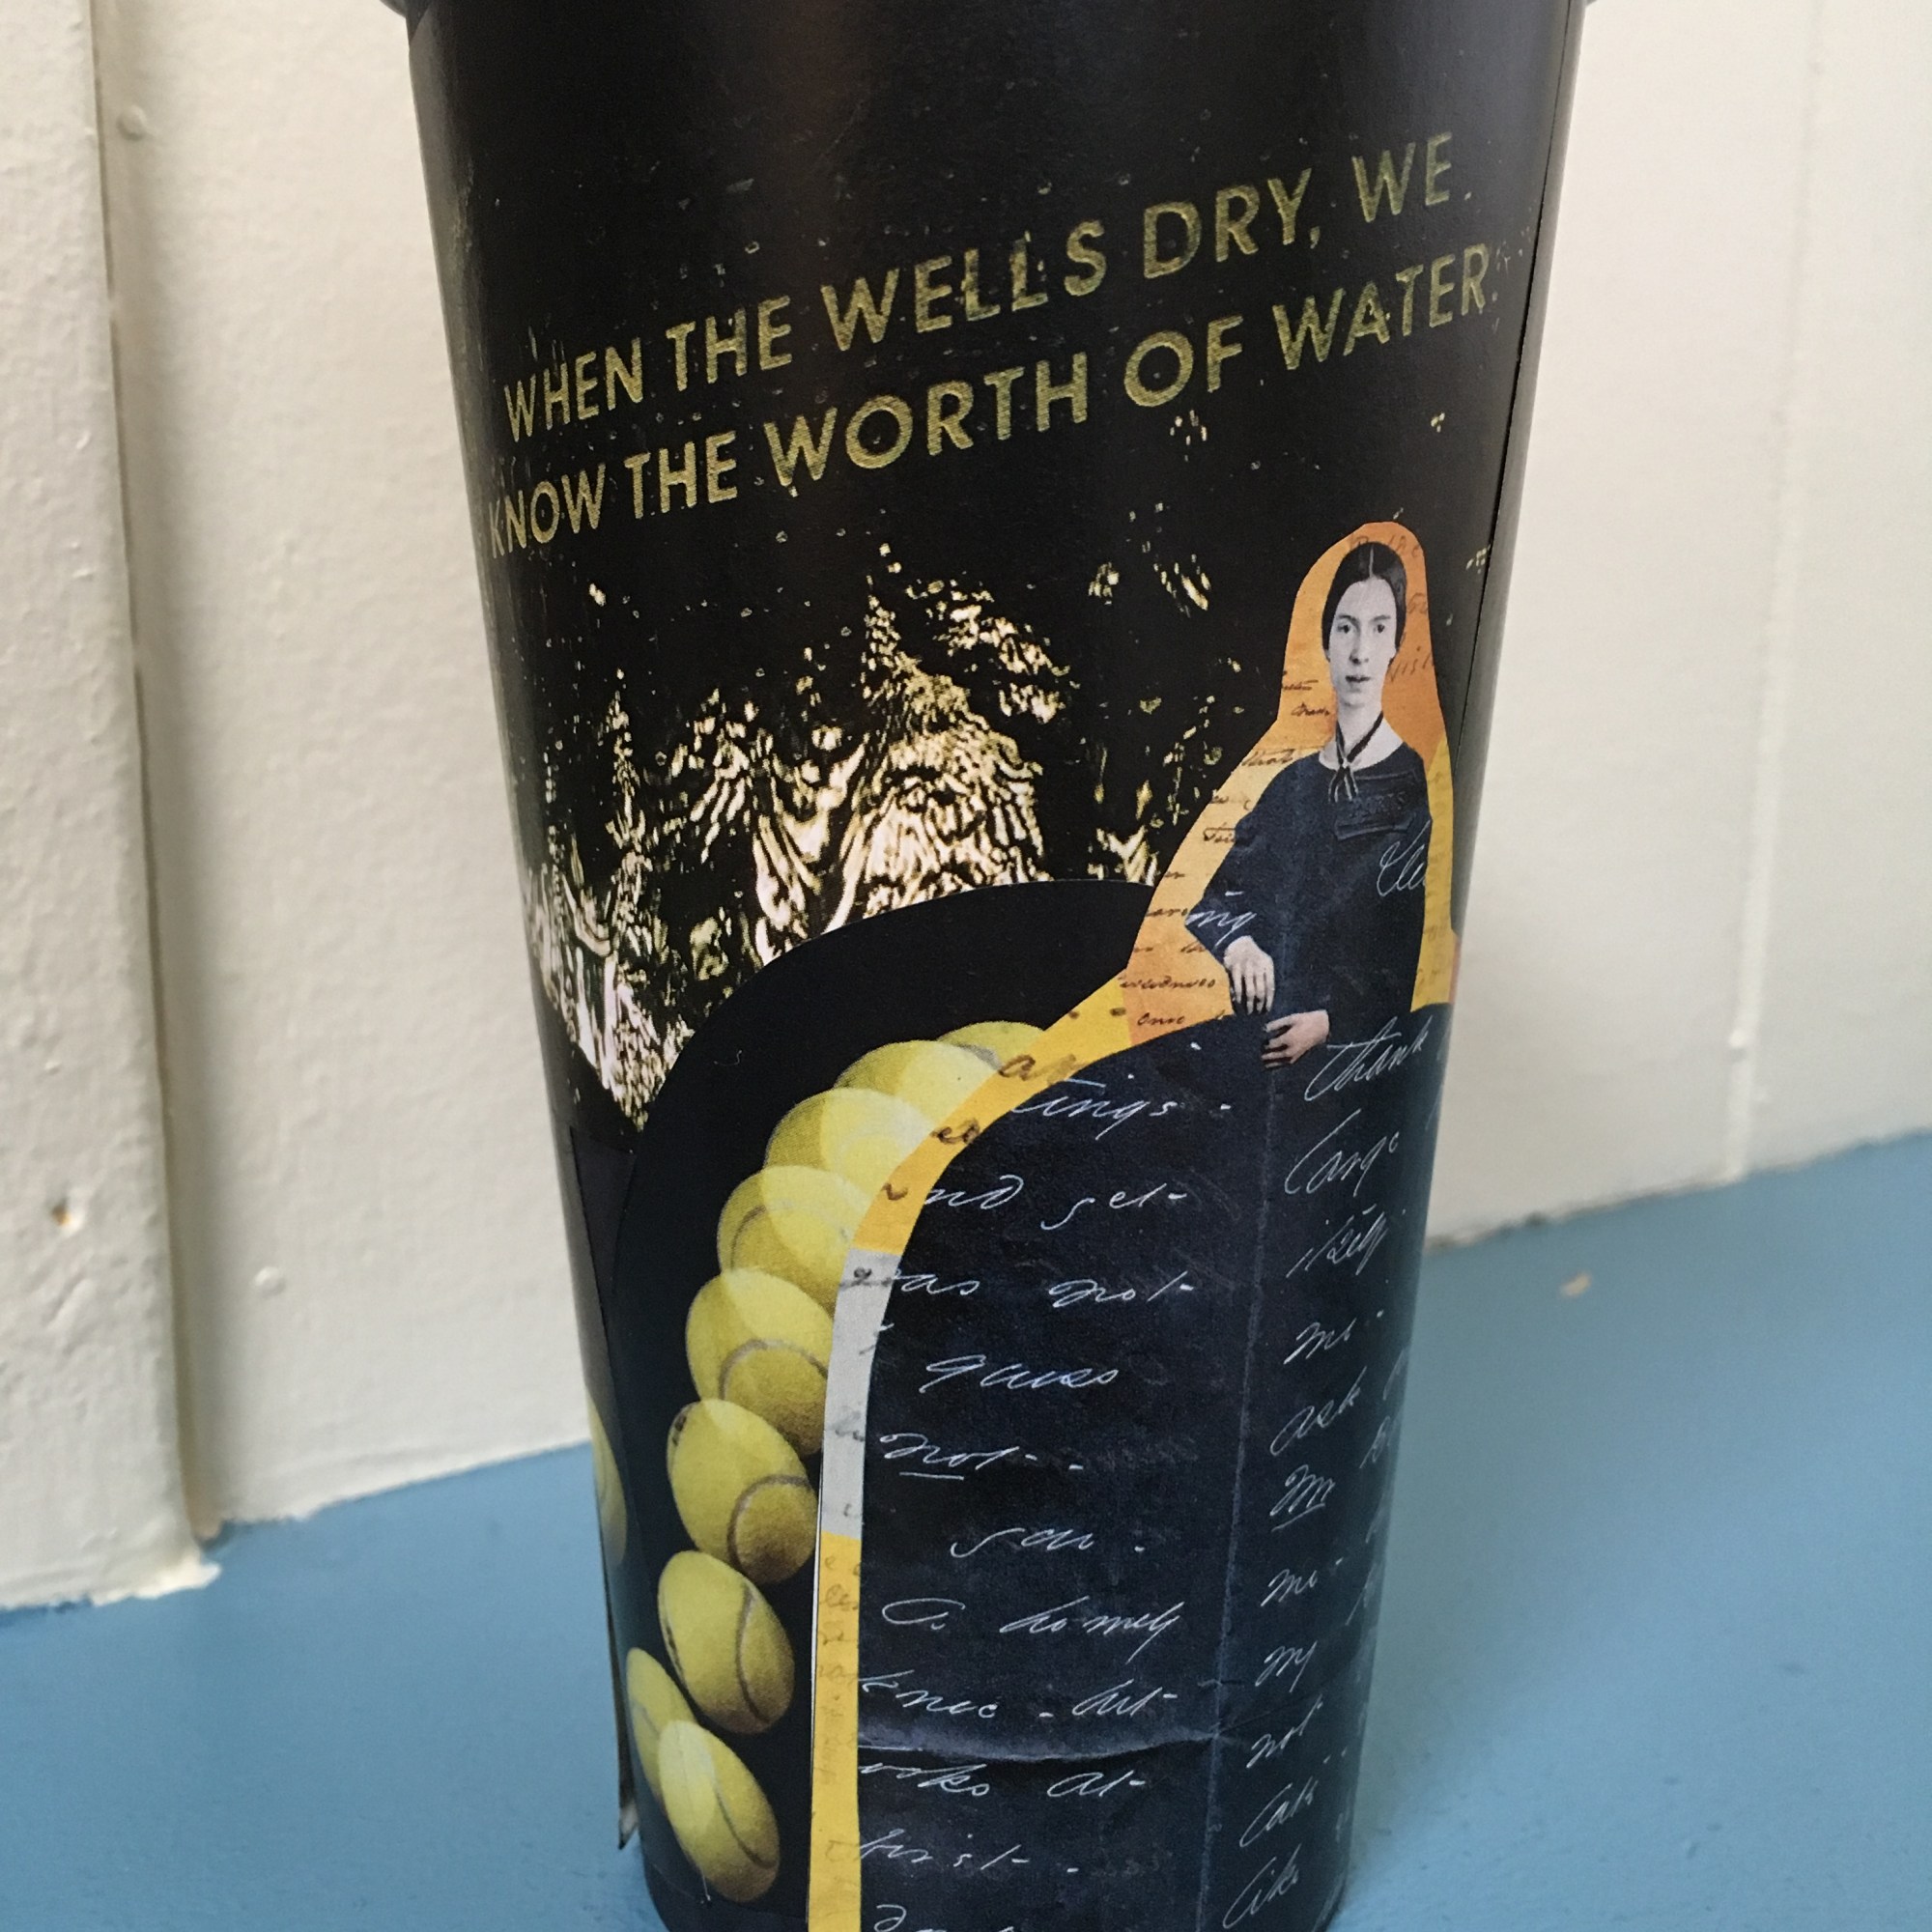
A note on the piece pictured below – this was very tricky to glue! For long / thin pieces, you always have to apply the glue in the direction of the thinnest piece, along the longest axis, opposite of where you are holding it down. The lady’s shape posed a challenge, because I needed to apply glue towards the top of her head, but her arm hanging down was counter to that flow. I just wound up carefully over-applying the paste as I went over her arm, being careful not to scrape it up in the process. The frame around her was difficult, too. I had to keep shifting my fingers around to be holding the piece opposite from the direction I was pulling the glue.

Step 3, tip 4 – use a brayer if needed to help flatten out the image. Be careful about keeping the brayer clean, though. Glue will ooze out from the edges of an image, get on the brayer, and then get spread all over your piece. The damp/dry cloths for your fingers can be used to clean off the brayer, too.

Step 4 – once all your images are settled in place, turn the piece around in the light so you can see where bits of paste are smudging the surface. Use the damp microfiber cloth to GENTLY dab the paste away, and blot dry with the dry cloth as needed. Use caution when doing this! For lower-quality papers or certain kinds of glossy or absorbent paper, the ink will very easily come off the image and/or smudge. It’s best to avoid getting glue all over in the first place.

Step 5 – other finishing touches. Use an x-acto knife to cut off areas of the image that overhang your substrate. I find this is easiest to do while the glue is still damp. I make sure to pull the knife down, away from the piece, and to wipe the glue off the knife on the damp cloth as I go, to avoid tearing the paper.

You can also test the corners of your images, to make sure they have stuck firmly. If they are peeling up, pop a little bit of paste under there and smooth them down, then clean up the excess glue if necessary.

Final step (other than framing) – After I’m sure there’s no damp glue on the surface of the piece, I will place my completed piece under a piece of cardboard on a flat surface and stack books on top, to press it flat if it started bowing from the moisture in the paste.

Last-last step: take the neatness mats and your credit card tool to a sink and wash off the excess paste. E-Z cleanup!

SPECIAL CASE:

If one of the images you are using is a “fussy cut” with really thin bits, for example, the tealights on the right side of the image below:

You can’t just apply paste to this with a credit card tool. It’ll tear.

Instead, apply a decently thin layer of paste to your neatness mat, with sufficient area to accommodate the image. Gently set the image (face-up) into the paste, and use a small pointed dowel to poke the image to make sure all of it has contacted the glue. Use an x-acto knife to gently pry up an edge until you can grip it and carefully, carefully peel up your now-glued image. Here’s a photo of what the “paste patch” looked like on the neatness mat after I peeled up the image (the paste was actually a bit too thick here):

So there you have it – all my gluing “secrets”.

I’m still super new to this, so if you have tips and techniques to share, I’d love to hear them!

I have jars of gloss DecoArt decoupage and Golden Acrylic Heavy Gel Medium that I haven’t even opened yet.

***

UPDATE 4/5/21

I have now tried the DecoArt gloss decoupage and can give an informed opinion about its usefulness and why I will not be using it regularly. The project I decided to try this on was applying images from poor-quality paper from encyclopedias onto waxy playing cards. This decoupage seemed to work OK for this application.

Benefit 1 – the liquid substance allows easy brushing onto even fussy cuts of paper. I’m still making good use of my “neatness mat” here.

Benefit 2 – this decoupage gloss can be brushed over the front surface of the work as a protectant. It also evens out surface texture differences between different types of paper and makes any “glue smudges” disappear. You can use a dampened brush or applicator sponge to get a smooth surface, but I kind of like the way the brush marks look.

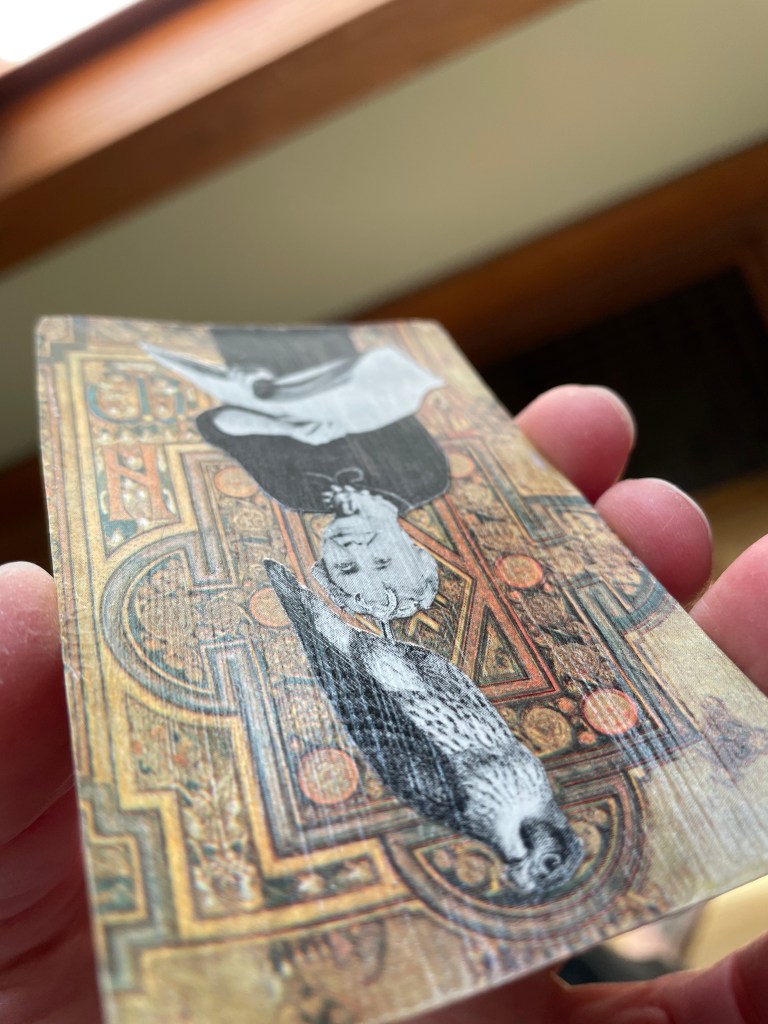
Drawback 1 – this stuff smells really bad, which is a dealbreaker for me. I think it stinks! I can’t use it unless the weather is nice enough for me to open the windows and turn on a vent fan.

Drawback 2 – this decoupage gloss seems to “hold fast” faster than the YES! paste I’m used to, which gets really frustrating with the type of placements I like to do – I can’t tweak the placement for more than a few seconds, depending on the paper and how thick a layer I apply.

Drawback 3 – this stuff is a bit harder to wash off than the YES! paste. It kinds of turns into a plastic-like sheet. Which is good for protecting the paper, I suppose.

Drawback 4 – while the bottle says this stuff is non-tacky, I had a couple of stacked pieces stick together, even after the state minimum cure time of 24 hours. Maybe I just needed to wait a bit longer. Still. I don’t want to make tacky artwork. (Ha!)

Drawback 5 – I am TERRIFIED that I am going to knock over the bottle and gloss my entire workspace!

Copyright 2021 by Katie Bradshaw

Preserving Eggs with Water Glassing

Back in June 2019, Bugman got a wild hair and bought four chicks and a coop for our backyard.

We got our first egg in January 2020.

By May, we were getting four eggs most days.

There’s only two of us in the house, so the eggs really started to accumulate, overflowing the storage space in our fridge. Thanks to our travels in other countries and learning different ways of doing things, we knew that eggs can be safely stored at room temperature, provided they do not get wet and their natural protective coating (called “bloom”) is intact. (We dated each carton and rotated to use the oldest stock first. Also, if it was cold outside and the eggs risked getting condensation when we brought them inside, they went straight into the fridge.)

The photo below shows some eggs we bought, unrefrigerated, at a grocery store in Costa Rica. This took me a long time to trust, since the only rotten-egg experience I’ve ever had was from eggs we bought at a farmer’s market in Iowa, where the sellers clearly did not know what they were doing. I complained about the rotten eggs they sold us, and they gave me a replacement dozen the next week, which were also rotten. Nasty-smelling, runny greenish eggs – YUCK! I will NOT eat green eggs, thankyouverymuch, Dr. Seuss.

We gave some of our excess eggs away to friends and neighbors, but the eggs kept coming. Summer is a bounteous time for backyard egg production, but the shorter day length of winter would mean our chickens would probably slow or stop laying. If we wanted to use our own happy chickens’ eggs throughout the winter, we’d have to find a way to preserve them longer term. There was also the matter of the pandemic, and me feeling the need to store up food in the event that supply-chain problems happened again. I started looking up methods of egg preservation.

I trust university Extension advice on food safety, as they distribute scientifically-rigorous, evidence-based information. But the only non-pickling preservation method I found was to freeze the eggs, which didn’t appeal to me because our freezer was getting filled up with garden vegetables, adding to the volume of fish and fowl Bugman had previously caught and hunted. Plus, the freezing instructions I found said to add sugar or salt to stabilize the egg yolk. I need to reduce my dietary salt for health reasons, and adding sugar meant I wouldn’t be able to use the eggs for any of my typical recipes, so I wasn’t keen on this preservation method.

I tried it anyway without the sugar or salt, breaking and scrambling four eggs into a container, freezing them, and taking them out 4 months later. The result made me a little queasy. The eggs took on a gelatinous, pudding-like texture. They were fine for scrambling, but just overall, not a great egg storage solution for me.

Then I found some information online about “water glassing” as an egg preservation method. There was no Extension-tested method I could find, but it’s apparently time-tested. A friend commented on a post I made about the technique:

I think my grandma talked about WW2 days when eggs were hard to find – never knew when you could “arrange” for some, and said they kept some in the cellar in a big barrel full of “something”, and she would go “fish” for them when needed.

Water glassing involves storing the eggs at cool room temperature in an over-saturated mineral solution — specifically calcium hydroxide, AKA pickling lime. I’m using the term “over-saturated” to mean there is more of the mineral than will dissolve in the water. I assume the mechanism of preservation is that the calcium will deposit on the eggs in the solution and seal up the pores in the egg to keep it from drying out. A “not fresh” egg will float in water, because moisture in the egg will slowly evaporate out through the shell, and air will slowly move in. (The online commentary on water glassing says not to use eggs preserved this way to make hard-boiled eggs without piercing the shell first, because pressure will not otherwise be able to escape, and the eggs will crack/explode when cooked.)

I followed the advice from Carolyn Thomas at homesteadingfamily.com for my water glassing experiment.

  • Make a solution of pickling lime (I bought mine at bulkfoods.com) with 1 ounce by weight pickling lime per 1 quart water. I used distilled water, since I didn’t want to take any chances with our softened-hard tap water that sometimes reeks of chlorine.
  • Put the solution in a food-safe container that has a tight cover. I re-used an emptied and washed 25oz pretzel jar.
  • Choose clean, fresh eggs that don’t have poop, feathers, or nesting material stuck to them. DO NOT WASH THE EGGS before you put them in the solution.

I gently lowered the eggs into the jar using a pasta scoop. I did not want to get that solution on my skin, since a calcium hydroxide solution is quite basic (according to wikipedia, pH of 12.4, about the same pH as household chlorine bleach, which is basic enough to cause chemical burns – don’t get it in your eyes, kids).

I kept adding fresh eggs until the jar was fairly full. Then I screwed the lid on, labeled the jar, and put it in a dark, cool corner of my basement. Note that because of the over-saturation of the solution, there was undissolved pickling lime at the bottom of the container.

Then, I waited.

Round about December, our household egg needs were exceeding the chickens’ output of maybe an egg a day.

I brought the 4-month-old jar of eggs up out of the basement and took off the lid. No funny aroma or anything, but it looked like we’d had some evaporation out of the container, as a solid crust of calcium hydroxide had built up on the surface.

I used the pasta scoop to pull out an egg, and then rinsed it off. I cracked a freshly-laid egg into a dish, and then cracked open the 4-month-old “water glassed” egg. The main difference I could see was that the egg white was runnier on the older egg (at left) than the fresh egg (at right).

I’ve used these water-glassed eggs for making fried eggs, scrambled eggs, and baked goods, including separating the egg whites and beating them to stiff peaks, and everything has worked out just fine.

I’d say the only downfall I’ve come across with this method is that the membrane around the egg yolk seems more fragile, so it’s harder to crack an egg without breaking the yolk.

We’ve not run into any food safety problems with this method that we’re aware of. Still, I would feel more comfortable recommending it if I knew it was scientifically tested. If anyone knows of any bona fide scientific food safety references about water glassing, please send them my way. I’m also curious about whether this preservation method changes the pH of the egg.

Copyright 2021 by Katie Bradshaw

First Day Hike

I’d kind of wanted to do a First Day Hike. I’ve done them before. But these days I seem to be fighting a molasses-esque inertia. A hike would be a good idea, but would also require planning and effort.

Well, social media struck again! A friend messaged me:

I enthusiastically agreed to tag along. (You’d think I wouldn’t have a life or any ambition without Facebook. And, sadly, in this age of the pandemic, it may not be far off the mark.)

I just hoped the hip that has been giving me trouble would hold out. (Spoiler alert: it was fine.) And I grumbled a bit at the 9:30am start time, given the likelihood of poor sleep on New Year’s Eve, on account of the stupid, loud fireworks. (Fireworks up to 50mg including “star and comet type color aerial shells without explosive charge for the purpose of making a noise” (emphasis mine) are legal for the general public here at Independence Day and New Year’s Eve. I suspect people go across the border to Wyoming to buy the larger, louder ones. It’s one of the things I loathe about living here.)

I re-remembered how to get to Cedar Canyon (I’ve written about hikes there in January 2012 and November 2015), and Bugman (my spouse) and I headed out with our cell phone cameras and backpacks with water, snacks, and clothing layers, arriving in the parking lot at 9:30 on the dot, after a slight delay caused by a car ahead of us having stopped in the middle of the road. (Maybe they saw the bighorn sheep?)

It’d be me, Bugman, Steve (my former editor when I wrote for the newspaper), and Irene (also a former newspaper reporter – she wrote about the hike here). Three recovering newspaper journalists and an entomologist. That’s got to be the start of some kind of joke, right?

We headed out on two-track for a ways before veering off towards a “game trail” Steve had discovered in satellite images — a human-navigable way to get up the steep incline to the top of the bluffs.

The “rock with a face” confirmed we were heading the right way.

It was not an easy hike up to the top. The air temperature was hovering around 34 degrees, but I shed my vest, hat, and mittens on the way up. The trail was on the shady side of the bluff and covered in the sort of snow that won’t give your feet any purchase. Piles of ponderosa pine needles underneath didn’t help with the traction. Yucca leaves stabbed through my pants.

The slope was steep enough in places that it felt more comfortable to scrabble upwards in a crawl. (I have more photos of this climb, but I was last in the climbing line, and I was taught as a journalist not to use pictures of people’s backsides.)

I forget what Steve was saying in this picture: “you’re almost there” or “what took you so long?” But I can read Irene’s expression: “do you believe this guy?”

Here’s a selfie with the view from where I was standing in the above photo. “Almost to the top!”

We stopped for a quick rest while scanning some rock-carved graffiti. Clearly it’s not a secret trail.

Group photo! You can see the shadow of the tree snag holding my phone. I tried to get a second shot at a different angle, but my phone fell out of the tree and started to tumble end-over-end down the slope. I’m glad it stopped tumbling! (Also glad I have a tough, waterproof phone case!)

So many strange and interesting pipy concretions! (Here’s all you’ll probably ever want to know about pipy concretions.)

Bugman strikes a pose with a deceased pine tree.

Here we go out onto my favorite part of this hike. This dry shelf, which had no trees or yucca (but did have piles of “sheep beans”), really captured my imagination with all the odd rock formations and colorful lichens.

I got kind of disoriented on this hike, and I’m not sure I could find this place again, but I’d like to try. I want to just hang out here.

In the photo below Scotts Bluff National Monument and the recognizable shape of Dome Rock are visible in the distance. (The Scottsbluff sugar factory, too, if you have really good zoom). The rocks scattered on the ground here looked to me like the fossilized bones of the earth, drawn to the surface by weathering.

Check out this ball mound of a plant that’s held this patch of earth together for probably decades. I feel like I should know what plant this is. Sandwort?

Those beautiful orange lichens! And that blue sky! A friend of mine once told me that the combination of blue and orange in art represents hope. One could sure feel hopeful being out in nature on a day like this.

Seriously, look at these rock shapes. One made me think of a seahorse. Another, an idol of some sort.

So interesting!

All along our path of travel on the top of the bluff we found bobcat tracks in the snow. At one point, the tracks did a crazy backwards twist alongside some rabbit tracks, and there were signs of some kind of action. Didn’t see any signs of a kill, though.

We did see some bighorn sheep down below in the valley. They didn’t seem too keen on being spied upon from above, and they took off running. Later, on our hike back along the ridgetop, we’d find some bighorn tracks superimposed on top of the tracks we made in the snow on the way out.

This is just the strangest thing up there on top of the bluff. A well-tied down cage, with the weathered polyester netting repaired with bits of camo-green polycord, two sides blocked at the bottom with pieces of plywood, that has clearly been there a long time. I couldn’t discern a door. If anyone can tell me what the heck it’s for, please comment!!

Time to head back, across the ups and downs of the bluff top, and then DOWN DOWN DOWN off the bluff, slipping and sliding on the snow and pine needles and colliding with yucca leaves. Luckily I never collided with a prickly pear patch, but I think some of them weaseled their way into Irene’s boots. I commented during the hike that, were I solo, I would have turned back long prior. I’m not in the best shape. My legs were getting weary-wobbly. I fell once and hyperextended my wrist, but the pain shook off in a minute or so.

My brain was getting weary-wobbly, too. I spotted a small piece of moss on the side of a tree as I descended and decided to name it Bob.

Bob Moss.

(As a friend later commented, Bob Moss must have been growing on a happy little tree.)

But despite all the weary-wobbliness, I made it! Some 8.5 miles on uneven, hilly terrain.

I went home, changed out of my wet socks and dirty pants, ate a bunch of food, and took a nap on the couch.

A great start to the year, grateful for health, nature’s beauty, and the socially-distanced companionship of fellow weirdos.

Copyright 2021 by Katie Bradshaw

2021 Crafting Project: Precipitation Scarf

Several years ago, I can’t remember where, I read about people who were knitting or crocheting “temperature blankets” to illustrate the local effects of climate change by coding the yarn color of each row of the blanket to each day’s high temperature. I loved this colorful idea! Smithsonian Magazine and the New York Times covered the phenomenon early in 2020. A scientist used crochet to illustrate temperature data in a conference poster in 2017. (I love this so much!)

Here’s a screen grab of what comes up in an image search for “temperature blanket”. So colorful!

I’ve crocheted a little in years past (my mom taught me the simple single stitch), but I’m not much of a fiber artist, so I never considered doing one.

Well, social media happened again.

A friend posted about the new yearlong challenge she was taking on: a temperature blanket! And some others of her friends were also planning to give it a go. I commented that I didn’t think I’d have the patience for a blanket, but thought a scarf might be doable. “Join us!” she said, and tagged me in a post about her “data visualization crocheting quest.”

That color palette is so choice!

OK, challenge accepted!

But, instead of doing temperature, I decided I wanted to log each day’s precipitation.

Here in the semi-arid High Plains, we don’t get a lot of moisture – just 15 inches a year, on average. Agriculture is able to thrive here thanks to the storage and distribution of snowmelt from the mountains to the west. Rainfall is often an EVENT. We keep a close eye on precipitation here. I’ve taken on these habits myself, often recording in photographs the rain, snow, and hail that fall at my house and sharing them with the Cheyenne National Weather Service.

(If you’re curious about that last picture, it’s featured in this blog post.)

As long as I’m making these observations already, I might as well crochet them into a scarf, hey?

I figured I’d represent rainfall in shades of blue and snow in shades of purple. Red for hail or graupel. I don’t want there to be red/hail in my scarf, but I know there will be. There always is. *sigh* I’m ok with graupel, tho. (Graupel is officially my favorite meteorological term.) In this arid climate, most of my scarf will be “no precip” – I decided I’d like a charcoal gray. And maybe a blended yarn of blue and purple to represent mixed precipitation?

Before going in search of yarn, I needed to figure out what sort of scale to use. I looked up rain data for the April-July period (using Weather Underground’s by-month daily history) and sorted the non-zero days into likely blocks. The snow was more variable, so I looked at Oct-Apr for 2019 and 2020 on the Daily U.S. Snowfall and Snow Depth reports from NOAA to get a sense of where to draw the boundaries.

Here’s what I came up with, measurements to be taken daily at 7am:
RAIN < 0.1″ = light blue
RAIN 0.1 – 0.5″ = medium blue
RAIN > 0.5″ = dark blue
SNOW < 1″ = light purple
SNOW 1-3″ = medium purple
SNOW > 3″ = dark purple

Then I went shopping . . . and came away a bit disappointed. The only yarn type that had the range of blues and purples I wanted didn’t have a charcoal gray in stock. I got a lighter gray with silver metallic threads instead. And no blue-purple blend, either. Oh well. That was probably too complicated anyway.

I still don’t know what I’m going to do on days with mixed precip, or on days with hail/graupel, since those will usually be accompanied by other precipitation. Crochet two rows? Weave a colored thread through the row? I’ll figure it out when I get there!

Here’s my “data visualization crocheting quest” colors and key:

The precipitation recorded at my house for January 1? Nada. The scarf begins in gray with silver sparkles.

I will perhaps updated this post when something exciting happens. (Like when I figure out what to do about those mixed precip days!)

UPDATE 2/1/21:

So, a month into this crochet project, I started over!

Here’s the old one, which I didn’t like:

Here’s some commentary:

  1. Turns out I was already starting to run low on my “no precip” color, and I heard it had been discontinued! Oh well – I didn’t like that color anyway. I bought some charcoal gray in another brand, and I like the look much better.
  2. Turns out I hated how the red for graupel / hail looked with the rest of the colors. By using charcoal gray for the “no precip” days, it freed up the sparkly light gray for graupel / hail instead.
  3. Those mixed precip days – I had one day that was a mix of rain and graupel. I used the light blue for the rain and wove the color for the graupel into the stitches when I was done. I tried crocheting both yarns together, and I thought it wound up too bulky / inconsistent-looking.
  4. I didn’t like the width of the scarf – too wide, so I made it narrower.
  5. With 31 days down, at 8.5 inches long already, this is going to be a LONG scarf – like 8 feet! That’s OK – all the better to wrap with, my dear!

Here’s what the current scarf looks like:

Copyright 2021 by Katie Bradshaw, aside from the screen grabs of the temperature blanket images

December 31 Reflections on the Ritual of Dawn and Christmas lights

I skipped a couple of mornings sitting out on the front porch. One morning I spent my dawn time shoveling snow. (Dawn time. I like that phrase. Sounds like “down time,” which it is.) One morning was just too cold and gray. One morning, I’d slept really fitfully, but fell back asleep in time to miss the sunrise.

I found myself missing the ritual.

The habit of sitting on the porch to sip my coffee and experience the morning is both an opportunity to start the day in a meditative way and mark a fresh start (to paraphrase Anne of Green Gables “a new day with no mistakes in it yet”) and also an opportunity for a daily vacation.

Looking back at some of my “before times” vacation photos, a common theme is capturing myself or my traveling companion(s) enjoying a beverage. Oftentimes, that beverage was a cup of coffee slowly sipped while looking out upon the morning.

A favorite memory of coffee on vacation, in western Sweden. The place we stayed had a small stone sitting area you could climb up to that looked out over the mouth of a fjord.

That’s one of the joys of vacation – having the time to sit and look around and contemplate life while sipping your coffee. My ritual of dawn has become a small daily vacation from the confinements and stresses of life in a pandemic.

I’ve tried a couple of times to sit out on the deck behind my house to witness the sunset and bid adieu to the day, but I found it unpleasant with the harshness of the winter sun angle as well as sort of false, since the day hadn’t really ended yet at 4:30 in the afternoon. Maybe as the year shifts to later sunsets I’ll sit on the deck with my spouse and toast the sunset with a glass of beer. For now, I’ll stick with the ritual of dawn.

December 31

The Christmas lights on half of my across-the-street neighbor’s bushes have gone wonky in their timing and are still glowing this morning, a near-match to the sky color at the horizon. This pleases me very much.

Similarly pleasing is the house around the corner from me, whose Christmas lights I can see from my back deck, and which I captured several evenings ago, similarly mirroring the light in the sky at sunset.

I’m really going to miss the Christmas lights when people start turning them off and taking them down. I turned mine on early this year because I needed that sparkle of nostalgia and whimsy. I wonder how long I can get away with keeping them on?

My spouse and I have been taking evening walks through the neighborhood when the sidewalks aren’t icy. Through a couple of windows we’ve glimpsed Christmas lights strung around people’s living rooms, up towards the ceiling, creating a lovely, cozy glow.

The idea of doing this in my living room half makes me want to go out in search of Christmas lights on clearance at local stores. It’d be easy enough to hang lights from the picture rail. But I don’t really want to buy more stuff, and I don’t really want to go traipsing around from store to store when virus transmission in my community is still high. Maybe if I get the opportunity to pick up some secondhand lights on Facebook marketplace . . .

There’s just something comforting about all those lights in a time of darkness.

My year-end wish for you is that you find all the light and comfort you need in 2021. When the sun comes up tomorrow, it will be a new year without any mistakes in it yet.

Copyright 2020 by Katie Bradshaw

2020 gingerbread insanity

I make gingerbread. It’s a thingIdo.

Back in April, inspired by graham cracker “Peep houses” my nieces made and fueled by social-distancing stir-craziness, I made my own Peep house out of gingerbread, swapping a friend some frozen tomatillos from my prior year’s garden in exchange for a needed bag of powdered sugar (baking supplies were often out of stock at grocery stores at that time). I freehanded and pieced together a design, and decorated it with candy I happened to have around the house, including the “Sport Beans” I bring on long bike rides. (Yes, I had candy eyeballs on hand, left over from a gingerbread haunted house project.)

Because I’d already made this gingerbread structure in spring 2020, I wasn’t planning to make another one for Christmas. There’s only two of us in the house, and without a planned disposition for the structure . . . man, that’s a lot of gingerbread to consume! I wanted to make a buche de noel instead. (Haven’t made one since high school French class.)

Besides, I didn’t really have an inspiring idea for a new structure to make.

Then a friend tagged me in a social media post.

Aha! 💡

My spouse’s time-of-COVID project this year had been to build a really nice coop and run for our backyard chickens.

The actual coop, in progress.

I could show off his work by modeling it in gingerbread! (And to make things even cooler, the gingerbread coop would be made with eggs collected in the coop the gingerbread was modeling!)

I took measurements and thought about it for awhile. Setting the scale at 4 feet = 12 inches would make for easy math. It would also make for a ridiculously large structure.

I started adding assorted candies to my grocery order, thinking about how I could represent the functionality of the real-life coop in my gingerbread model. I could use chocolate Jelly Bellys to represent the eggs! Maybe use peppermint patties and Rollos to create the feed and water dispensers. Pull-apart Twizzlers could serve as ropes and cords. How would I do the stilt-like legs? Pretzel rods? How would I represent the hardware cloth on the run? Could I fill it in with crushed Life Savers? Make it look like stained glass? Cover it with Fruit Roll-ups to represent the tarps that protect the chickens from wind and rain and sun?

I realized with the simple shapes, I wouldn’t need to use pattern pieces. I could just roll, measure and cut as I went along.

As is typical for COVID times, the grocery stores ran out of molasses the week I went to make the gingerbread dough. 🙄 Thankfully, a friend had extra jar in her cabinet and gave it to me. Full steam ahead! ✅

As I typically do with gingerbread structures, I rolled and cut out the largest pieces first, while I had the largest amount of dough available to work with.

And I discovered a problem.

The largest piece of my gingerbread coop was the roof – 15 inches by 12 inches. The largest cookie sheet I had that had thick enough construction to avoid warping while heating/cooling had an interior dimension of 16.5 inches . . . by 11.75 inches. None of the pieces of the coop structure that had more than one dimension greater than 12 inches wide would fit inside the pan! Aack!

My workaround: bake the largest pieces on the back of the cookie sheet, to eke out a few more fractions of an inch of support without pushing the gingerbread up against the sides of the pan. That would also allow the piece to be slid off the back of the pan directly onto the cooling rack, minimizing the flexing that can cause structural instability when the gingerbread is hot.

All was going well until I started re-using the foil by rolling out another gingerbread shape on the clean back – a practice I’d developed to conserve on the amount of materials I use. I’d forgotten that I should only re-use foil for smaller pieces. The foil under one of the big pieces of gingerbread stuck to the back of the cookie sheet, and I may have said a few bad words while trying to get it unstuck without damaging the gingerbread.

I got 10 pieces of gingerbread cut and baked, and I ran out of dough. I had to make another batch. Luckily, the grocery store had molasses back in stock by then.

I cut and rolled 13 more pieces. I also twice-baked the two largest pieces of gingerbread that would sit horizontally and be subject to gravity droop (the roof and floor of the coop), since the gingerbread seemed a tad on the “underbaked” side. I put a cooling rack in a cookie sheet, set the gingerbread on top of the cooling rack, and put it in the oven for 5-7 minutes. It dried out nicely and was much firmer.

Time to start assembling!

I had decided to use thick candy cane sticks cut down to 6 inches tall as the legs to support the coop, using plenty of icing as well as an extra scrap of gingerbread at the top to help distribute the load.

Crumpled wax paper and tape hold one of the legs steady against a cereal box for support at the icing dries.

I knew this would be a critical step, so I left the structure to dry for 4 hours. (Usually, I can start building up a gingerbread structure within 30 minutes, but I wanted to make sure this would hold together.)

In the meantime, I took one of the frames from the chicken run, set it on top of some plastic wrap, and piped icing onto it to represent hardware cloth. (I had decided during the baking process that a 10-by-8.5-inch space was just too large to fill with melted Life Savers.)

The pattern left on the plastic wrap after it was pulled off the hardened icing was kinda pretty.

By the time I was done piping the hardware cloth, my hand was so tired, I vowed to try using “windowpane” pretzels for the rest of the run. Unfortunately, the grocery stores ran out of that pretzel shape (too many people making holiday snack mixes and Rollo “turtles”?), so I wound up piping two more frames to complete the back and side of the run and called it good.

Moving on with the construction . . . things went well, until they didn’t.

I set the coop base upright and cemented it to the cardboard/foil platform. I added one wall, two walls, three walls – so far, so good. I iced in the nest box structure.

I put the fourth wall on, which required a little finagling, because one of the other walls had gotten slightly cracked after it bent while it was still hot after baking, and I had to apply some pressure for it to make contact with the icing on the fourth wall . . . and suddenly everything was moving.

NOOOOOOOOOOOOO!

I’m lucky the structural failure turned out the way it did. The icing at the tops of the candy cane pillars had NOT hardened, and all four slowly let loose at the same time, causing the structure to slide sideways. Because I happened to have two hands on the structure at that moment, trying to press the walls together, I was able to help control the fall, and the coop landed upright, on top of the tipped-over pillars, which thankfully had fallen onto the countertop and not off the edge and onto the floor. I had my husband help me lift the structure off the tipped pillars onto a sheet of waxed paper, to let things set up while I regrouped.

Note: do not use hard candy – especially not peppermint sticks – as weight-bearing structure in gingerbread! The candy sticks had turned to slime where they contacted the icing. I guess that makes sense – I think the icing in contact with the gingerbread dries so quickly because the porous gingerbread helps wick away the moisture. The peppermint sticks did not. In fact, based on having tried to stir a cup of hot chocolate with a peppermint stick, if the candy had wicked the moisture, it might have weakened the candy’s structure. Maybe it would have hardened if I’d left it for a week. But I was not willing to have my kitchen unavailable for that long. (In retrospect, I bet the peppermint stick legs would have worked if I’d cut circular holes in several squares of gingerbread to receive the candy stick, and stacked them together and let them dry before inserting and cementing the candy stick in place.)

Back to the drawing board . . . Maybe I could use graham crackers? Mmmm . . . kind of crumbly. Or go back to the pretzel rod idea, cementing several of them together for stability? I placed a grocery order for pretzel rods (plus enough additional items to reach the minimum order cutoff). In the meantime, I decided to make another half batch of gingerbread, just in case. Probably would be a better idea to have square legs? Maybe cut pretzels wouldn’t be strong enough?

Good thing I’d decided to make more gingerbread. Turns out the store was out of pretzel rods. Argh. #COVIDtimes

With the coop structure well set, I cemented the roof in place. While that was drying, I cut, baked, cooled, and assembled four four-sided pillars to serve as the coop legs. I gently flipped the coop onto its roof, cemented the legs in place, and let it all dry overnight.

I still wasn’t trusting that the four legs would securely hold the weight of the coop plus decorations, so I used the remaining dough to make additional “hardware cloth panels” to anchor between the front and back sets of legs, to help prevent torquing.

I gently inverted the coop back onto its feet and . . . it stayed up!

Bit by bit, I added details to the structure, propping them up with whatever was at hand while they dried.

Finally, around 8pm on December 23, a full week after I’d begun work in earnest, the gingerbread chicken coop was done!

Allow me to give you a tour!

This thing is 3 feet wide, 1 foot deep, and 18 inches tall at its highest point. It used 2.5 batches of gingerbread and 3.5 batches of royal icing, as well as Dots, Chewy Sweet Tarts, candy canes, peppermint sticks, Red Hots, pull-and-peel holiday Twizzlers, Fruit Roll-ups, Sixlets, Andes mints, chocolate coins, chocolate sprinkles, Rollos, Christmas light bulb gumballs, Life Savers, Tootsie Rolls, Starbursts, candy eyeballs, shredded wheat cereal, and Jelly Bellys.
The chickens were made from 10 Tootsie Rolls, heated briefly in the microwave, molded to shape, and put in the fridge to set. Starbursts made the comb/wattle and beak.
The chicken headed up the ramp, and the chicken on the roost inside were firmed up on top of a piece of candy cane, so they’d have a slot underneath to help hold them in place. Bits of Twizzler strung across the run support a Fruit Roll-Up tarp roof.
The nest boxes, Jelly Belly eggs on one side, a chicken on the other, its rear end authentically pointed towards the door.
Here’s the back side of the coop, the side that would be up against the house or fence if it was the real coop. The ventilation door on this side has a “rope” attached to it, just like the real coop does, to allow the vent door to be pulled open from the front of the coop. (The corresponding ventilation door on the front of the coop, which is easier to reach, just gets propped open with a stick (candy cane).
On the roof of the coop: the (white) ventilation door rope, the (red) “extension cord” that powers a water heater and heater panel inside the coop (only needed in the winter), and an Andes mint “solar panel” and (green) cord that powers . . .
. . . a small light bulb (yellow Christmas light gum ball). (Note the drip loop in the cords, to prevent rain/snow from running down the cord into the coop.) I decided not to make the large coop access door in gingerbread – too big and too tricky to hang. (The hinges would be on the left.) I left the run door off underneath, too, the better to see inside.
Underneath the coop – a food dispenser and a water dispenser. A half a lifesaver worked really well to secure the items to the ceiling. (The Twizzler “rope” alone kept threatening to pull out of the icing.)
Inside the coop: a candy cane perch next to a radiant heater panel (Andes mints) powered via extension cord hookup to the house, as well as a heated water dispenser (far left side of the photo). On the far right of the photo is some “white rope” that goes up to a Life Saver “pulley” just out of the frame, which connects to . . .
. . . another Life Saver “pulley” and the chicken door to the coop, which can be lowered closed at night in the winter to help keep the chickens warmer.
Just as in the real coop, the surface underneath this main roost is smooth. This smoothness makes it easier to clean out the accumulated droppings. I decided not to model the chicken droppings in the gingerbread coop. You’re welcome.

So that’s it. That’s the full tour.

I’m writing this post four days after the coop construction was completed. Some of the Dots are starting to fall off the structure. The tarp roof is sagging and starting to pull on the walls of the run and bow them inward. Time to start eating this thing!

Anybody want some gingerbread?? I’m more than happy to share!!

PS – every bit of this gingerbread chicken coop is edible, with the exception of the cardboard/foil base. It’s a rule I work under – everything must be edible! I get scornful when I get excited about a really cool gingerbread structure, only to learn that it’s “not edible” because it was assembled with glue. Glue?? Why would you do that, when edible royal icing holds so firmly?

Copyright 2020 by Katie Bradshaw

December 22-26 Ritual of Dawn

I’ve been slacking on my habit. Already.

December 22

I did go outside, but I didn’t immediately sit down to write. Here’s the photo I took of a small plane that flew noisily over my house – a regular flight from our small local airport.

I remember thinking about the noise pollution that people who live near airports suffer. (I grew up in a Chicago suburb not too far from busy O’Hare airport, but not close enough to have to hear the constant roar or jets taking off.) I was thinking about how these people are usually lower income. (Who would put up with that aggravation if you didn’t have to?)

December 23

The wind in the early morning hours was terrible – sustained 30-40, gusting 60-70. The roar kept waking me up, even woke my husband, who’s an excellent sleeper. The bicycle wind spinners in the yard were rolling at an insane clip. I resented the wind. I did not want to go out in the gray morning and sit in it.

December 24

Up late the night before tending to my gingerbread creation (I should post about it), and I slept almost past the sunrise, too late to make coffee and sit out there.

December 25 – Christmas Day

I set my alarm, though I wasn’t going anywhere, not to sit for the sunrise, which, despite the passing of the solstice, is coming still later, at 7:21, but to make waffles and eat breakfast in time to join a multi-time-zone family Zoom call at 8am Mountain / 9am Central / 10am Eastern.

December 26

A warm morning. Didn’t need my mittens. Really quiet, too. Apart from a car with an apparent tire problem rolling by on a nearby street, the noisiest thing was the squirrels ripping around on a tree, their claws on the bark sounding like one of those rain sticks.

A squirrel sat hunched in the tree in front of me. I imagined it having a sugar hangover.

The day before, I’d put out some bags of Christmas candy in a basket next to my library. By evening, five of the bags had disappeared from the basket, but I found one of them in the flowerbed, torn open and partially emptied.

Most of the color in the sky this morning seemed to be on the periphery of the sunrise. When the sun did come up and brighten the air, it felt like a sort of comforting hug for my brain. Apparently I needed light today.

Copyright 2020 by Katie Bradshaw

December 21 Solstice Ritual of Dawn

An odd morning – a Monday with only five vehicles passing by. No student walking. The schools are closed for Christmas break.

No break for working folks, though. My neighbor with the lunch cooler is right on schedule. Two contractor pickup trucks roll by, one with an engine so loud it vibrates my porch floor. The public schools still have some employees on the clock as well. One of the vehicles to pass by is a school district vehicle – the driver going down the street with a cell phone pressed to his left ear.

I hear a rooster crow somewhere off to the south. I heard him yesterday, too.

Up above, a jet silently passes, probably filled with people risking virus transmission to spend time with loved ones. It’s a powerful impulse in this dark season.

The jet’s contrail is tinted dawn pink. Because of the reference point of the tree branches, I can see that the contrail is rapidly moving to the south as it dissipates behind the plane. Must be some substantial wind way up there.

I start to think about how that plane can be an analogy for a human life. How we’re traveling together with a certain group of people – some by choice, some by chance. How we can leave a mark on the world that will eventually fade into nothingness, but which still in aggregate influences the planet. How even during the time we’re here on this earth and making our impacts, the winds around us can shift our accomplishments off course. It can’t be helped. That’s the way the world works.

A man walks by on my side of the street, a beagle happily trotting and sniffing ahead of him at the end of a leash. The man says good morning, and I return his greeting. I suppose I’m not exactly inconspicuous on the porch this morning, with my safety-yellow shell jacket. (I’m planning to go for a run when my porch sit and my coffee are done.)

I saw the man and his dog yesterday, too, a block away, as I headed out for a Sunday morning socially-distanced grocery pickup.

It’s nice to live in a neighborhood where people become familiar.

Yesterday morning along with my newspaper, I picked up from the porch a gift bag filled with mini bread loaves – zucchini and pumpkin – that my neighbors across the street had left. They do this every year. Say what you want about our consumerist culture (and there are definitely words to be said), the traditional giving of gifts and thinking of others at this time of year can be a much-needed source of light in the darkness.

The sun rises. A new day begins.

May you find light at this winter solstice. The days ahead will only get brighter.

Copyright 2020 by Katie Bradshaw

December 17 and 18 Ritual of Dawn

December 17

The morning sky is a color show, tinting even the air orangey-pink, shifting colors so subtly from moment to moment it’s hard to perceive a change unless you look away and look back again. The strips of colored cloud align at times with the angle of the power lines across the street. This pleases me.

So many spectacles like this I’ve missed because I had my nose stuck to a screen.

I marvel at the spreading branches of the trees, how they have grown to fill in every space and capture sunlight as efficiently as possible. I think about how that efficiency of growth is mirrored by the tree’s roots underground, unseen.

A pair of squirrels chase around the tree branches like kids swarming the jungle gym at recess. A piece of dislodged bark plops to the sidewalk.

The neighbor with the lunch cooler has to get out the scraper to clear the frost from his windshield before he can drive away. He does a thorough job of it.

A pickup truck races past, probably going 35 miles per hour on this narrow residential street around the time kids are headed to the three schools up the block. And with spots of ice remaining on the street here and there! It makes me angry, this disregard for others, constantly angry, how easy personal motorized vehicles make it for individual whims and conveniences to endanger others in the public space.

I guess it’s not just the news cycle and social media posts that can get me riled before sunrise.

The light brightens. A new day begins.

December 18

It’s raining. Sleeting, actually. Little pellets are building up in the street. Doesn’t seem to deter some people from driving too fast. Or tailgating. I send a mental thank-you to the passing drivers who are taking it slow.

The garbage truck rumbles and clanks and thumps through the alley across the street, the last normal pickup day before Christmas next week. I glimpse the truck between the houses. It passes on a side street, rolling through the stop sign, as most vehicles do. I see its lights reflected in the house window across the street as it picks up the trash in the alley behind my house.

No birds this morning. No squirrels. One dog barks.

The regular kid dropoff happens, the car crunching tracks through the sleet pellets.

The regular student appears on the sidewalk across the street. No hat.

The neighbor headed to work with his lunch cooler has to turn on his windshield wipers to clear the sleet before he takes off.

It’s warm enough that I don’t need the hood of my shell jacket. I pull it back and realize I can better hear the clattering of the sleet pellets on dried leaves and on the tarps covering the boat and the old car in my neighbor’s driveway.

The sunrise is a minute later again this morning, but I don’t perceive it through the cloud cover. The street light sensors don’t, either. A gray dawn. A new day begins.

Copyright 2020 by Katie Bradshaw

December 15 and 16 Ritual of Dawn

I’m going to keep doing these posts for the time being, maybe up until and through the winter solstice. It provides me a deadline for getting up and getting dressed in time to meet the sun, and it provides me practice in observing. Also a quiet moment to greet the day before I encounter things that make me angry. (The news, social media posts.)

December 15

A gray morning, clouded over. No color in the sky. The sunrise is a minute later than it was. 7:16 now.

We are such creatures of habit. I see the same red car as yesterday (no music this time). The same neighbor getting into his truck with his lunch cooler to head to work. The same neighborhood drop-off of kids. The same student walking to school.

The same dogs barking. The same twittery birds chasing between shrubberies on the block.

The same squirrel, but this time there are two. They are smaller squirrels, probably the young born this year, probably one of the ones that tried and failed and tried and failed and tried and failed to build a nest in my tree this spring, daily biting off and dropping loads of branches for me to pick up.

A change from the day before – a man walks by with his small dog on a very long leash. I hear him uttering words I can’t make out from across the street. Is he talking to his dog? Talking to himself? On a phone call?

Also, emergency vehicle sirens in the distance. Car wreck, probably. The streets are still icy. Most people driving down the street – 12 vehicles (or 13 – I lost count) – are going too fast for this iced-over, narrow residential street.

According to the light level and the time, the sun has risen. Another day has begun.

December 16

A warm winter morning. It felt mild when I stepped out to grab the newspaper. The north-south streets have gotten enough sun and warmth to clear away most of the ice, though any shaded east-west streets are still snow-packed.

The color is back in the sky – a warm orangey-red that reminds me of the port wine cheese balls that are a family food tradition at this time of year. The yellow leaks out and blue seeps in, and the sky takes on a lovely lavender tint.

The squirrels are back in the trees. One of them spots me in my seat on the porch and barks and flaps its tail.

I see the lunch-cooler neighbor head out. The dropping-off-kids person comes again, too. I wonder if they see me sitting here under my blankets with my cup of coffee and think I’m a weirdo. It almost makes me want to abandon my post. But heck, it’s my porch. I can sit out here anytime I want. And more neighborhoods could do with regular watchful eyes on the street. That’s how it used to be.

Human eyes are being replaced by cameras that the police like to knock on your door and ask about if a crime occurs in your neighborhood. When I moved to this community 11 years ago (11!), I was weirded out by a house a few blocks away that had security cameras on it. Nowadays, it seems like half the doors you might approach are spied upon by doorbell cameras.

A sudden surge of cars in the street accompanies a surge in the light level. The sun has risen. A new day has begun.

Copyright 2020 by Katie Bradshaw